One more step
Please complete the security check to access www.bodum.com
Why do I have to complete a CAPTCHA?
Completing the CAPTCHA proves you are a human and gives you temporary access to the web property.
What can I do to prevent this in the future?
If you are on a personal connection, like at home, you can run an anti-virus scan on your device to make sure it is not infected with malware.
If you are at an office or shared network, you can ask the network administrator to run a scan across the network looking for misconfigured or infected devices.
Cloudflare Ray ID: 3c7fb9f38ebb8ec7 • Your IP : 185.87.51.142 • Performance & security by Cloudflare
Bodum Bistro 11001 Instructions For Use Manual
Related Manuals for Bodum Bistro 11001
Summary of Contents for Bodum Bistro 11001
11001 BISTRO POUR OVER COFFEE MACHINE AUFBRÜH-KAFFEEMASCHINE CAFETIèRE FIlTRE AUTOMATIqUE KAFFEBRYGGER MED OVERHÆlDNING CAFETERA DE FIlTRO CAFFETTIERA AUTOMATICA PER INFUSIONE FIlTER-KOFFIEzETAPPARAAT AUTOMATISK STRIlKAFFEBRYGGARE CAFETEIRA COM FIlTRO KAHVINKEITIN POUR OVER -TEKNIIKAllA КАПЕЛЬНАЯ КОФЕВАРКА Instruction for use ENGlISH Gebrauchsanweisung DEUTSCH Mode d’emploi FRANÇAIS Brugsanvisning DANSK.
Page 3: Important Safety Instructions
Welcome to BODUM ® Congratulations! You are the proud owner of a BISTRO pour over coffee machine from BODUM . Read through these instructions carefully ® before you use the pour over coffee machine. IMPORTANT SAFETY INSTRUCTIONS – Read all of the information before you use the appliance for the first time.
– The appliance must never be switched on without the coffee shower (11) and filter holder (6). – Avoid contact with the steam that is generated during the brewing process. Otherwise there is a risk of scalding. – Scalding may occur if the lid is removed during the brewing cycles. –.
Page 5: Important Information
12 Large stopper 13 Small stopper 14 Safety switch 15 ON/OFF switch & scale indication 16 BODUM measuring spoon IMPortAnt InforMAtIon POWER CABLE – The appliance is supplied with a short power cable in order to reduce the risk of persons becoming entangled or tripping over a long cable.
(6) with inserted coffee filter (7) carefully out of the hous- ing (1) of the pour over coffee machine. In order to make a jug of coffee fill the coffee filter (7) with approx. 8 BODUM measuring spoons (16) of ®.
– Guide the thermos jug (8) into the pour over coffee machine with the dosage lid (9) and lid cap (10) in place. Ensure that the thermos jug (8) is positioned precisely beneath the filter holder (6). Note: The safety switch (14) detects the thermos jug (8) when it is in place in the appliance.
Page 8: Maintenance And Care
– For simple cleaning unscrew the dosage lid (9) from the thermos jug (8). Rinse the thermos jug (8) thoroughly with warm water after use. Warning: The thermos jug (8) is not suitable for washing in the dishwasher. Do not immerse the thermos jug in water. –.
Page 9: Technical Data
cLeAnInG tHe coffee sHoWer The coffee shower (11) can be cleaned and de-scaled separately. In order to do so remove the housing lid (5) from the housing (1) of the pour over coffee machine. Then lift the coffee shower (11) carefully vertically, up and out of the pour over coffee machine.
& WArrAntY conDItIons All BODUM products are produced from high quality, durable materials. ® However, if it should be necessary to replace parts please contact your BODUM ® dealer, a BODUM shop, the general BODUM representative in your country or ®.
Page 11: Wichtige Sicherheitshinweise
Willkommen bei BoDuM ® Herzlichen Glückwunsch! Sie sind stolze(r) Besitzer(in) einer BISTRO- Aufbrüh-Kaffeemaschine von BODUM . Lesen Sie diese Anleitung sorg- ® fältig, bevor Sie die Aufbrüh-Kaffeemaschine verwenden. WICHTIGE SICHERHEITSHINWEISE – Lesen Sie alle Hinweise, bevor Sie das Gerät zum ersten Mal verwenden. Das Nichteinhalten der Anweisungen und Sicherheitshinweise kann zu gefährli-.
– Wird Abdeckung während Brühzyklus entfernt, besteht verbrühungsgefahr. – Kochendes Wasser kann verbrennungen verursachen. – Achten Sie darauf, dass die EIN/AUS-Taste (15) stets frei zugänglich ist. – Tauchen Sie das Gerät nie in Wasser: Denken Sie daran, dass es sich um ein Elektrogerät handelt.
12 Stopfen gross 13 Stopfen klein 14 Sicherheitsschalter 15 EIN/AUS-Taste & Entkalkungs -Warnleuchte 16 BODUM-Masslöffel BesonDere HInWeIse NETZKABEL – Es wird ein kurzes Netzkabel mitgeliefert, um die Gefahr zu verringern, dass Sie sich in einem langen Kabel verheddern oder darüber stolpern.
– Entnehmen Sie die Thermoskanne (8) aus der Aufbrüh-Kaffeemaschine. Ziehen Sie nun den Filterträger (6) mit eingelegtem Kaffeefilter (7) vorsichtig aus dem Gehäuse (1) der Aufbrüh-Kaffeemaschine. Für eine Kanne Kaffee füllen Sie den Kaffeefilter (7) mit ca. 8 BODUM -Masslöffel (16) mittelfein ®.
– Führen Sie die Thermoskanne (8) mit montiertem Dosierdeckel (9) und Deckelkappe (10) in den Kaffee-bereiter ein. Achten Sie darauf, dass die Thermoskanne (8) genau unterhalb des Filterträgers (6) positioniert ist. Hinweis: Der Sicherheitsschalter (14) erkennt, ob sich die Thermoskanne (8) im Gerät befindet.
– Für eine einfache Reinigung schrauben Sie den Dosierdeckel (9) von der Thermoskanne (8) ab. Spülen Sie die Thermoskanne (8) nach Gebrauch mit warmem Wasser gründlich aus. Achtung: Die Thermoskanne (8) ist nicht für die Spülmaschine geeignet. Die Thermoskanne nicht in Wasser tauchen. –.
Page 17: Technische Daten
KAffeeDuscHe reInIGen – Die Kaffeedusche (11) lässt sich auch separat reinigen und entkalken. Nehmen Sie hierzu den Gehäusedeckel (5) vom Gehäuse (1) der Aufbrüh- Kaffeemaschine ab. Anschliessend heben Sie vorsichtig die Kaffeedusche (11) senkrecht aus der Aufbrüh-Kaffeemaschine. Nun entfernen Sie den Stopfen gross (12) und den Stopfen klein (13) durch langsames Herausziehen aus der Kaffeedusche.
-Händler, ein BODUM -Geschäft, die BODUM ® ® ® Generalvertretung in Ihrem Land, oder besuchen Sie www.bodum.com. Garantie: BODUM gibt auf die “BISTRO”-Aufbrüh-Kaffeemaschine eine 2-jährige ® Garantie ab Kaufdatum für Materialfehler oder Funktionsstörungen, die auf Fehler in Herstellung oder Entwurf zurückzuführen sind. Wenn alle Garantiebedingungen erfüllt werden, ist die Reparatur kostenlos.
Bienvenue chez BoDuM ® Félicitations ! Vous êtes maintenant l’heureux propriétaire d’une cafetière filtre automatique BISTRO de BODUM . Lisez attentivement les instructions ® qui suivent avant d’utiliser votre appareil. IMPORTANTES CONSIGNES DE SÉCURITÉ – Lisez toutes les informations avant d’utiliser l’appareil pour la première fois.
électrique, la fiche ne peut être insérée dans une prise polarisée que dans un sens. Si la fiche ne s’insère pas complètement dans la prise, retournez-la. Si elle ne s’insère toujours pas, contactez un électricien qualifié. Ne modifiez en aucun cas la fiche.
5 Couvercle du socle 6 Porte filtre 7 Filtre à café 8 Pichet thermos 9 Bouchon doseur 10 Bouchon thermos 11 Diffuseur 12 Grand obturateur 13 Petit obturateur 14 Bouton de sécurité 15 Interrupteur ON/OFF & indicateur de tartre 16 Cuillère doseuse BODUM.
Page 22: Information Importante
InforMAtIon IMPortAnte CORDON D’ALIMENTATION – L’appareil est fourni avec un cordon d’alimentation court afin de réduire le risque de s’emmêler ou de trébucher provoqué par un long cordon. – Il est possible d’utiliser des rallonges si l’utilisation se fait avec soin. –.
(1) de la cafetière filtre automatique. Pour faire un pichet de café, ajoutez dans le filtre à café (7) environ 8 mesures de café de mouture moyenne à l’aide de la cuillère doseuse BODUM . Pour une quantité inférieure de café, ®.
Note: la cafetière filtre automatique s’éteint également automatiquement dès que le pichet thermos (8) est enlevé de l’appareil pendant la phase de prépa- ration du café. – Pour reprendre le processus de préparation du café, appuyez simplement sur le bouton ON/OFF (15) à nouveau une fois que le pichet thermos (8) a été remis en position correcte dans la cafetière filtre automatique.
entretIen et soIn DETARTRAGE DE LA CAFETIÈRE FILTRE AUTOMATIQUE – Afin de garantir un fonctionnement correct de votre cafetière filtre auto- matique, il est important de s’assurer que l’appareil ne soit pas endurci par le tartre. Le cycle optimal dépend de la dureté de l’eau, celle-ci diffère d’un pays à.
nettoYAGe Du DIffuseur A cAfe Le diffuseur (11) peut être nettoyé et détartré séparément. Pour cela, retirez avec précaution le couvercle (5) du socle (1) de la cafetière filtre automatique. Puis soulevez verticalement le diffuseur (11) avec précaution pour le retirer de la cafetière filtre automatique.
à condition que toutes les conditions de garantie soient remplies. Il ne sera effectué aucun remboursement. Conditions de garantie: le certificat de garantie doit être dûment complété par le vendeur au moment de l’achat. BODUM décline toute responsabilité ®.
BoDuM ® Tillykke! Du er den stolte ejer af en BISTRO kaffebrygger med over- hældning fra BODUM . Læs denne vejledning omhyggeligt, inden du ® bruger kaffebryggeren med overhældning. VIGTIGE SIKKERHEDSANVISNINGER – Læs alle oplysningerne omhyggeligt, før du bruger apparatet første gang.
– Undgå kontakt med den damp, der dannes under brygningen. Ellers kan der være risiko for skoldning. – Skoldning kan forekomme, hvis låget fjernes under brygningen. – Kogende vand kan forårsage forbrændinger. – Sørg for, at TÆND/SLUK-knappen (15) altid er let tilgængelig. –.
12 Stor prop 13 Lille prop 14 Sikkerhedsafbryder 15 TÆND/SLUK-knap og målestok 16 BODUM måleske vIGtIGe oPLYsnInGer LEDNING – Apparatet er udstyret med en kort ledning for at minimere risikoen for at blive viklet ind i eller snuble over en længere ledning.
– Fjern termokanden (8) fra kaffebryggeren med overhældning. Tag nu fil- terholderen (6) med det isatte kaffefilter (7) forsigtigt ud af kabinettet (1) på kaffebryggeren med overhældning. For at lave en kande kaffe, skal kaf- fefiltret (7) fyldes med ca. 8 BODUM måleskeer (16) af mellemfint-malet ®.
– Før termokanden (8), med det påsatte doseringslåg (9) og låghætte (10), ind i kaffebryggeren med overhældning. Sørg for at termokanden (8) er placeret lige under filterholderen (6). Bemærk: Sikkerhedsafbryderen (14) registrerer når termokanden (8) er på plads i apparatet. Hvis termokanden ikke er placeret korrekt i kaffebryggeren med overhældning, vil apparatet ikke tænde.
– Skru doseringslåget (9) af termokanden (8) for en simpel rengøring. Rens termokanden (8) grundigt med varmt vand efter brug. Advarsel: Termokanden (8) kan ikke vaskes i opvaskemaskine. Nedsænk ikke termokanden i vand. – For en nemmere rengøring kan låghætten (10) fjernes ved at trække den af doseringslåget (9).
Page 35: Tekniske Data
renGØrInG Af DrYPfunKtIonen Drypfunktionen (11) kan rengøres og afkalkes separat. Fjern kabinetlåget (5) fra kabinettet (1) på kaffebryggeren med overhældning for at gøre dette. Løft derefter forsigtigt drypfunktionen (11) lodret op og ud af kaffebryggeren med overhældning. Fjern nu den store prop (12) og den lille prop (13) ved at trække disse langsomt ud af drypfunktionen.
GArAntIBetInGeLser Alle BODUM produkter er fremstillet af holdbare materialer af høj kvalitet. ® Skulle der alligevel være dele, der skal udskiftes, så kontakt din BODUM ® forhandler, en BODUM -forretning, BODUM -repræsentanten i dit land, eller ® ®.
Page 37: Instrucciones De Seguridad
Bienvenido a BoDuM ® ¡Enhorabuena! Es usted el flamante propietario de la cafetera de filtro BISTRO de BODUM . Lea atentamente estas instrucciones antes de usar ® su cafetera. INSTRUCCIONES DE SEGURIDAD IMPORTANTES – Lea las instrucciones de principio a fin antes de utilizar el aparato por primera vez.
este enchufe sólo puede introducirse en una posición determinada en tomas polarizadas. Si no encaja perfectamente en la toma, déle la vuelta. Si aún así no consigue introducirlo sin forzarlo, póngase en contacto con un electricista cualificado. No modifique el enchufe de ninguna forma. –.
7 Filtro del café 8 Jarra térmica 9 Tapa dosificadora 10 Tapadera 11 Difusor 12 Tapón grande 13 Tapón pequeño 14 Interruptor de seguridad 15 Interruptor ON/OFF e indicador de acumulación de incrustaciones de calcio 16 Cacito de medida de BODUM.
InforMAcIÓn IMPortAnte CABLE DE ALIMENTACIÓN – El aparato se entrega con un cable de alimentación corto a fin de reducir el riesgo de que alguien pueda enredarse o tropezar con él. – Si se adoptan las debidas precauciones puede usarse un alargador para el cable. –.
(7) con unas 8 medidas de café medianamente molido; para medir el café. Si desea preparar menos utilice los cacitos de BODUM ® café, reduzca el número de cacitos de café. (Consulte la tabla Dosificación recomendada.) Deslice con cuidado el receptáculo del filtro (6) con el filtro.
2 Depósito de agua 3 Asa del depósito de agua 4 Tapa del depósito de agua 6 Receptáculo del filtro 7 Filtro del café 9 Tapa dosificadora 10 Tapadera 11 Difusor 12 Tapón grande 13 Tapón pequeño 16 Cacito de medida –.
– Llene el depósito de agua (2) con la solución descalcificadora o con una solu- ción de agua y vinagre (tenga cuidado de no superar la línea marcada con MAX) y coloque el difusor (11), el receptáculo del filtro (6), el filtro de café (7) (sin café.
Sin embargo, no se admitirán devoluciones. Condiciones de la garantía: el vendedor deberá cumplimentar el certificado no cubre de garantía en el momento de la compra. La garantía de BODUM ® los daños atribuibles a un uso o manejo inadecuados, al desgaste normal por el uso del aparato, a un cuidado o mantenimiento deficientes o incorrectos, o a un manejo o manipulación indebidos por parte de personas no autorizadas.
Benvenuti a BoDuM ® Congratulazioni! Ora possedete una caffettiera automatica per infusio- ne BISTRO di BODUM . Leggete attentamente queste istruzioni prima di ® utilizzare l’apparecchio. IMPORTANTI ISTRUZIONI DI SICUREZZA – Leggere tutte le informazioni prima di utilizzare per la prima volta l’elet- trodomestico.
– Non accendere l’apparecchio senza acqua. – Non riempire il serbatoio dell’acqua (2) sopra la riga MAX. – Non accendere mai l’apparecchio senza il diffusore del caffè (11) e il portafil- tro (6). – Evitare il contatto con il vapore prodotto durante l’infusione per non ustio- narsi.
Page 47: Informazioni Importanti
12 Tappo grande 13 Tappo piccolo 14 Interruttore di sicurezza 15 Pulsante ON/OFF e indicatore di incrostazione 16 Misurino BODUM InforMAZIonI IMPortAntI CAvO DI ALIMENTAZIONE – L’apparecchio è dotato di un cavo di alimentazione piuttosto corto per ridur- re al minimo il rischio che le persone possano inciampare o calpestare il cavo.
– Se viene utilizzata una prolunga, i valori nominali indicati devono corri- spondere a quelli dell’apparecchio. Se l’apparecchio è collegato a terra, la prolunga deve essere un cavo con messa a terra con almeno 3 conduttori. Non lasciare mai che un lungo cavo penzoli dal tavolo o dal piano di lavoro; i bambini non devono poter essere in grado di tirarlo e non deve esservi il rischio di inciamparvi.
(7) con circa 8 misurini BODUM ® (16) di caffè macinato fine. Per una quantità inferiore di caffè, usare una quantità minore di caffè macinato fine. (Consultare la tabella con le infor- mazioni sul “dosaggio consigliato”).
2 Serbatoio dell’acqua 3 Manico del serbatoio dell’acqua 4 Coperchio del serbatoio dell’acqua 6 Portafiltro 7 Filtro del caffè 9 Coperchio di dosaggio 10 Tappo del coperchio 11 Diffusore del caffè 12 Tappo grande 13 Tappo piccolo 16 Misurino – Per una pulizia semplice, svitare il coperchio di dosaggio (9) dalla brocca termica (8).
– Riempire il serbatoio dell’acqua (2) con la soluzione disincrostante o di acqua e aceto, senza superare la riga MAX, e collocare il diffusore (11), il portafiltro (6), il filtro del caffè (7) (senza caffè macinato) e la brocca termica (8) con il coperchio di dosaggio (9/10) inseriti nell’apparecchio nelle posizioni previste.
Page 52: Dati Tecnici
Se sono soddisfatte tutte le condizioni di garanzia, le riparazioni sono gratuite. Non è possibile richiedere rimborsi. Condizioni per la garanzia: il certificato di garanzia deve essere compilato in tutte le sue parti dal rivenditore al momento dell’acquisto. BODUM non conce- ®.
Welkom bij BoDuM ® Hartelijk gefeliciteerd! U bent nu de trotse eigenaar van een BISTRO filter-koffiezetapparaat van BODUM . Lees deze instructies zorgvuldig ® door voordat u het filter-koffiezetapparaat gebruikt. BELANGRIJKE VEILIGHEIDSVOORSCHRIFTEN – Lees eerst alle informatie voordat u het apparaat voor het eerst gebruikt. Als de instructies en de veiligheidsvoorschriften niet worden opgevolgd, kunnen gevaarlijke situaties ontstaan.
past, draai de stekker dan om. Als hij dan nog niet past, neem dan contact op met een gediplomeerd elektricien. Pas de stekker op geen enkele manier aan. – Het apparaat mag niet worden ingeschakeld zonder water. – vul het waterreservoir (2) niet verder dan de lijn MAX. –.
1 Behuizing 2 Watertank 3 Handvat van watertank 4 Deksel van watertank 5 Bovendeksel 6 Filterhouder 7 Koffiefilter 8 Thermoskan 9 Doseerdeksel 10 Kandeksel 11 Koffiesproeier 12 Grote stopper 13 Kleine stopper 14 veiligheidsschakelaar 15 AAN/UIT-knop en kalkindicator 16 BODUM maatlepel.
Page 56: Belangrijke Informatie, Koffie Zetten
BeLAnGrIJKe InforMAtIe NETSNOER – Het bij het apparaat geleverde netsnoer is kort om risico’s op knopen en struikelen te verminderen. – Een verlengsnoer kan worden gebruikt, als daar voldoende zorgvuldig mee om wordt gegaan. – Als een verlengsnoer wordt gebruikt, moet het nominale vermogen van dat snoer minimaal minimaal gelijk zijn aan dat van het apparaat.
– verwijder de thermoskan (8) uit het koffiezetapparaat. Haal nu voorzichtig de filterhouder (6) met daarin het koffiefilter (7) uit de behuizing (1) van het filter-koffiezetapparaat. Als u een kan koffie wilt zetten vult u het kof- fiefilter (7) met ongeveer 8 BODUM maatlepels (16) filtermalingkoffie. Pas ®.
2 Waterreservoir 3 Handvat van waterreservoir 4 Deksel van waterreservoir 6 Filterhouder 7 Koffiefilter 9 Doseerdeksel 10 Kandeksel 11 Koffiesproeier 12 Grote stopper 13 Kleine stopper 16 Maatlepel – Snel schoonmaken: schroef het doseerdeksel (9) los van de thermoskan (8). Spoel de thermoskan (8) na gebruik grondig schoon met warm water.
– Spoel naderhand de afzonderlijke onderdelen grondig af met koud water en laat het apparaat ten minste twee keer doorlopen met koud, helder water. voordat u het apparaat laat doorlopen, moet u controleren of alle onderde- len op de juiste manier zijn teruggeplaatst in het koffiezetapparaat. –.
Page 60: Technische Gegevens
Reparaties worden gratis uitgevoerd als aan alle garantievoorwaarden is vol- daan. Restitutie is niet mogelijk. Garantievoorwaarden: het garantiecertificaat moet volledig worden ingevuld door de verkoper ten tijde van de aankoop. De garantie van BODUM dekt ® geen schade die is veroorzaakt door onjuist gebruik, normale slijtage, onvol- doende of onjuist onderhoud, oneigenlijk gebruik, of gebruik door onbevoeg- de personen.
BoDuM ® Gratulerar! Du är nu den stolta ägaren till en BISTRO automatisk stril- kaffebryggare från BODUM . Läs dessa anvisningar noggrant innan du ® börjar använda din automatiska kaffebryggare. VIKTIGA SÄKERHETSANVISNINGAR – Läs all information innan du börjar använda apparaten för första gången.
– Apparaten får aldrig kopplas in utan strilhuvudet (11) och filterhållaren (6) på plats. – Undvik kontakt med ångan som uppstår medan kaffet bryggs. Annars finns det risk att du skållar dig. – Du kan även skålla dig om du avlägsnar locket medan bryggning pågår. –.
1 Hölje 2 vattenbehållare 3 vattenbehållarens handtag 4 vattenbehållarens lock 5 Höljets lock 6 Filterhållare 7 Kaffefilter 8 Termoskanna 9 Doseringslock 10 Lockets kåpa 11 Strilhuvud 12 Stor propp 13 Liten propp 14 Skyddsomkopplare 15 Strömbrytare och kalksignal 16 BODUM måttsked.
vIKtIG InforMAtIon NÄTSLADD – Apparaten är försedd med en kort nätsladd för att reducera risken att någon fastnar i sladden eller snubblar över den. – På villkor att du är tillräckligt försiktig kan en förlängningssladd användas. – Om en förlängningssladd används måste denna uppfylla minst samma vär- den som gäller för själva apparaten.
– Tag ut termoskannan (8) ur kaffebryggaren. Tag sedan försiktigt ut filter- hållaren (6) med isatt kaffefilter (7) ur kaffebryggarens hölje (1). För att brygga en kanna kaffe fyller du kaffefiltret (7) med ca. 8 BODUM måttske- ® dar (16) med bryggmalet kaffe. För en mindre mängd kaffe använder du en förhållandevis mindre mängd malt kaffe.
2 vattenbehållare 3 vattenbehållarens handtag 4 vattenbehållarens lock 6 Filterhållare 7 Kaffefilter 9 Doseringslock 10 Lockets kåpa 11 Strilhuvud 12 Stor propp 13 Liten propp 16 Måttsked – För enkel rengöring skruvar du lös doseringslocket (9) från termoskannan (8). Skölj termoskannan (8) grundligt med varmt vatten efter bruk. Varning: Termoskannan (8) är inte lämpad att diskas i maskin.
– Skölj sedan de olika delarna separat med kallt vatten och skölj apparaten genom att köra den minst två gånger med rent, kallt vatten. Se först till att alla delar har satts tillbaka på rätt sätt i kaffebryggaren. – Allt övrigt underhåll ska utföras av ett auktoriserat serviceombud. renGÖrInG Av strILHuvuDet Strilhuvudet (11) kan rengöras och avkalkas separat.
Page 68: Tekniska Data
GS, CE, ETL, CETL servIce ocH GArAntIvILLKor Alla BODUM produkter är tillverkade av hållbara material av hög kvalitet. Om ® du ändå skulle behöva byta ut någon del, var god kontakta din BODUM åter- ® försäljare, en BODUM butik, den allmänna BODUM representanten i ditt land ®.
Bem-vindo à BoDuM ® Parabéns! Você é o orgulhoso proprietário de uma Cafeteira com Filtro da BODUM . Leia estas instruções atentamente antes de utilizar a ® Cafeteira com Filtro. INSTRUÇÕES DE SEGURANÇA IMPORTANTES – Leia toda a informação antes de usar a cafeteira pela primeira vez. O apa- relho pode provocar lesões ou situações perigosas caso não leia e siga estas.
contacte um electricista qualificado. Não modifique a ficha seja de que forma for. – O aparelho não deve estar ligado à corrente sem água. – Não encha o reservatório com água (2) acima da linha MAX. – O aparelho nunca deve estar ligado à corrente sem o chuveiro do café (11) e o suporte do filtro (6).
7 Filtro do café 8 Jarro térmico 9 Tampa de dosagem 10 Coroa da tampa 11 Chuveiro do café 12 Rolha grande 13 Rolha pequena 14 Interruptor de segurança 15 Botão ON/OFF e indicação de escala 16 Colher de medida BODUM.
InforMAÇÃo IMPortAnte CABO ELÉCTRICO – O aparelho é fornecido com um cabo eléctrico curto, a fim de reduzir o risco de tropeçar e preso num cabo mais comprido. – Embora com extrema cautela, é possível usar uma extensão eléctrica. – Se for usada uma extensão eléctrica os valores nominais indicados na exten- são devem cumprir os mínimos do aparelho.
(6) com o filtro do café dentro (7) com cuidado da base (1) da cafeteira com filtro. Para fazer um jarro de café encha o filtro do café (7) com cerca de 8 colheres de medida BODUM (16) de café moído normal. Para uma quan- ®.
2 Reservatório da água 3 Pega do reservatório da água 4 Tampa do reservatório da água 6 Suporte do filtro 7 Filtro do café 9 Tampa de dosagem 10 Coroa da tampa 11 Chuveiro do café 12 Rolha grande 13 Rolha pequena 16 Colher de medida –.
– Encha o reservatório de água (2) com a solução anti-calcário ou solução de água e vinagre (não encha acima da linha MAX) e coloque o chuveiro de café (11), o suporte do filtro (6), o filtro do café (7) (sem café moído) e o jarro térmico (8) com a tampa de dosagem (9/10) nas suas posições correctas.
Se todas as condições da garantia tiverem sido cumpridas, as reparações serão gratuitas. Não se fazem reembolsos. Garantia: O certificado de garantia deve ser preenchido e carimbado pelo comprador na altura da compra. A BODUM não presta garantia contra danos ®.
BoDuM -laitteen käyttäjäksi ® Onneksi olkoon! Olet nyt pour over -tekniikalla varustetun BODUM ® kahvinkeittimen ylpeä omistaja. Lue nämä ohjeet huolellisesti ennen pour over -tekniikalla varustetun kahvinkeittimen käyttöä. TÄRKEITÄ TURVALLISUUSOHJEITA – Lue kaikki ohjeet ennen laitteen ensimmäistä käyttöä. Ohjeiden ja turvalli- suutta koskevien tietojen noudattamatta jättäminen voi johtaa vaarallisiin.
– Laitetta ei saa koskaan kytkeä päälle ilman kahvisuihkua (11) ja suodatinpi- dintä (6). – vältä kosketusta höyryyn, joka kehittyy suodatusprosessin aikana, sillä tämä voi aiheuttaa palovamman. – Kannen poistaminen keittämisen aikana voi aiheuttaa palovammoja. – Kiehuva vesi voi aiheuttaa palovammoja. –.
1 Kotelo 2 vesisäiliö 3 vesisäiliön kahva 4 vesisäiliön kansi 5 Kotelon kansi 6 Suodatinpidin 7 Kahvisuodatin 8 Termoskannu 9 Annostelukansi 10 Kannen peitelevy 11 Kahvisuihku 12 Suuri korkki 13 Pieni korkki 14 Turvakytkin 15 virtakytkin ja kalkinilmaisin 16 BODUM-mittalusikka.
tÄrKeItÄ tIetoJA vIRTAJOHTO – Laitteessa on lyhyt virtajohto pitkään johtoon sotkeentumisen tai kompastu- misen välttämiseksi. – Jatkojohtoa voidaan käyttää varovaisuutta noudattaen. – Jos jatkojohtoa käytetään, sen nimellisarvojen on noudatettava laitteen vähimmäisnimellisarvoja. Jos laite maadoitetaan, jatkojohdon on oltava kol- mijohtiminen maadoitettu johto. Pitempi johto on asetettava niin, ettei se roiku pöydän reunojen tai työtasojen kulmien yli, että.
– Poista termoskannu (8) pour over -tekniikalla varustetusta kahvinkeittimes- tä. Ota nyt suodatinpidin (6), jossa on kahvisuodatin (7), varovasti pois pour over -tekniikalla varustetun kahvinkeittimen kotelosta (1). voit tehdä täyden kannullisen kahvia täyttämällä kahvisuodattimeen (7) noin 8 BODUM ® mittalusikallista (16) keskikarkeaksi jauhettua kahvia. Pienempään kahvimää- rään tarvitaan sopivasti vähennetty määrä.
2 vesisäiliö 3 vesisäiliön kahva 4 vesisäiliön kansi 6 Suodatinpidin 7 Kahvisuodatin 9 Annostelukansi 10 Kannen peitelevy 11 Kahvisuihku 12 Suuri korkki 13 Pieni korkki 16 Mittalusikka – Kierrä annostelukansi (9) pois termoskannusta (8) puhdistuksen helpottami- seksi. Huuhtele termoskannu (8) perusteellisesti lämpimällä vedellä käytön jälkeen.
– Huuhtele tämän jälkeen erilliset osat perusteellisesti kylmällä vedellä sekä huuhtele laite antamalla kylmän ja puhtaan veden juosta laitteen läpi aina- kin kahdesti. varmista tätä ennen, että kaikki erilliset osat on koottu oikein pour over -tekniikalla varustettuun kahvinkeittimeen . – valtuutetun huoltoedustajan on tehtävä kaikki muut huoltotoimet. KAHvIsuIHKun PuHDIstus Kahvisuihku (11) voidaan puhdistaa ja siinä.
Page 84: Tekniset Tiedot
1,2 litraa / 40 nesteunssia Testimerkinnät GS, CE, ETL, CETL HuoLto- JA tAKuueHDot Kaikki BODUM -tuotteet on valmistettu korkealaatuisista ja kestävistä mate- ® riaaleista. Jos osia joudutaan kuitenkin vaihtamaan, ota yhteys BODUM ® jälleenmyyjääsi, BODUM -myymälään, maasi yleiseen BODUM -edustajaan tai ® ®.
Page 86
Page 88
Page 90
Page 92
(parts & labor) for the ® period of two years from the date of original consumer purchase. To be eligible for warranty coverage the product must be purchased from an authorized BODUM dealer and proof of purchase must be provided. ®.
Kaffee bodum
From Lavazza World

PERFECT BLENDS
From plantations all around the world, Lavazza selects the best coffees to create the numerous blends that we enjoy every day.

COFFEE RECIPES
Lavazza’s Training Centre reinvented the Espresso Martini using Frangelico, a traditional Piedmontese liqueur.

COFFEE RECIPES
The fluffy egg-free mascarpone cream combines with the coarse texture of “paste di meliga” biscuits, and the hot coffee finds its perfect match with the recipe’s chilled ingredients.

COFFEE AND HEALTH
A cup of coffee contains about 50 mg of caffeine and its stimulant action, which lasts for one or two hours after it has been drunk, acts on the cerebrospinal nervous system.
French Press Coffee Tutorial
October 7, 2015 by Michael Allen Smith

If you are looking for purchase recommendations, check out our French Press Guide.
Of all the different coffee brewing methods, the one I’ve used the most has been the French Press. Also known as a press pot or Melior, the French Press is a simple way to make a rich delicious cup of coffee.
The French Press is a low tech portable coffee brewing method. Let hot water steep over coarsely ground coffee for 3-4 minutes before pressing down the filter and serving. It doesn’t get more simple than that. This tutorial will go into grind, water temperature, steep time and fixing common issues when the brew is less than perfect.
![]()
#1 Dosing The Coffee
By weight or by volume? Weighing will give you more repeatable results than using volume, as there can be more variance measuring when using tablespoons than a gram scale. However, the French Press is pretty forgiving so either method is fine. We will cover both methods.
Measure By Weight
There is no consensus on the ideal brewing ratio for the French Press. Before putting this tutorial together, I visited the recommendations of many roasters and discovered ratios between 10:1 and 18:1. When I threw out the outliers and averaged the rest, the ratio came out to 15.5:1. That means 15.5 grams of water for every 1 gram of coffee.
The fact the ranges were so different speaks to the fact that French Press coffee can taste great using different measurements and precision is less important than other brewing methods.
Measure By Volume
Going by volume, a good starting point is to use 1 tablespoon of coffee for every 4 fluid ounces of water. Some of the stronger recipes say 1 tablespoon of coffee for every 3 ounces. You may increase the amount of coffee to your desired taste. Below is a general range to get you started.
- Bodum 3 cup (12 oz) = 3-4 tablespoons
- Bodum 4 cup (17 oz) = 4-5 tablespoons
- Bodum 8 cup (34 oz) = 9-10 tablespoons
- Bodum 12 cup (51 oz) = 13-15 tablespoons

#2 Grind Coffee and Heat Water
Before you start grinding the coffee, heat up some water.
The French Press uses a coarse grind. See the photo below.
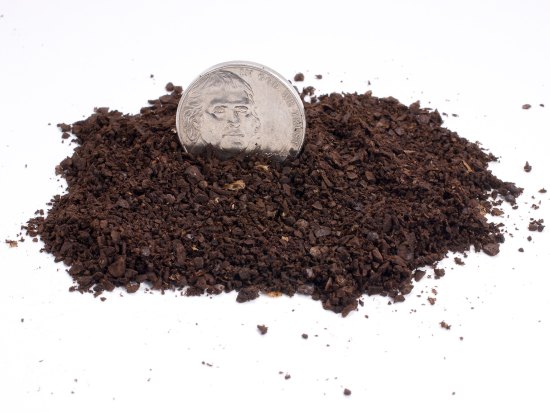
#3 Add Coffee and Water to French Press
Add the ground coffee into the French Press. Once the water reaches boil, wait about 30 seconds before pouring onto the coffee. This will lower the temperature from boiling to around 200° F, which is ideal for brewing.
Start a timer and pour water onto the coffee grounds.
When you pour the water into the French Press there may be a bloom at the top where the coffee is either clumped or not making contact with the water. You can minimize that by pouring slowly in a controlled manner.

#4 Stir (or not)
Even if you pour slowly, there might be coffee grounds clumped at the top that aren’t in contact with water. A gentle stir will solve that problem.
I used to stir the entire French Press. That is not necessary. Just stir the top inch. Use a chopstick or spoon. Some advise using a wooden spoon as there have been cases where a metal spoon has cracked the glass of the French Press. But if you are gentle, that shouldn’t be a concern. The goal here is to get all the coffee making contact with water.
After this, place the plunger on top of the coffee pot in the up position. This will minimize heat loss. Don’t press down yet.

#5 After 3-4 Minutes Press Down Slowly
The recommended brew time for the French Press ranges from 2.5 – 6 minutes, with the most commonly cited time being 4 minutes.
I have brewed thousands of French Press pots and prefer 3.5 minutes. Full extraction and rich without being too heavy. Fellow INeedCoffee contributor Chris Arnold likes 2.5 minutes. At the other end of the spectrum, Seattle Coffee Works advises a 6 minute steep for Indonesian coffees (4 minutes for other beans). This will come down to personal preference.
Beyond all the debates about optimal brewing times, is the reality that in the kitchen we can easily become distracted waiting for our coffee to finish brewing. The longer the brew time, the more opportunities for distraction. Aiming for a 3 to 3.5 minute brew time has worked much better for me than the 4 to 6 minute range.
When it does come time to press the plunger down, be gentle. Slow and even. It should have some resistance, but not too much. If there is no resistance, you might need to grind a little finer. If it is too hard to press down, use a coarser grind.

#6 Serve Coffee
Pour and enjoy. French Press coffee will have some sediment. To minimize getting that grit, I usually leave 1/2-1 inch of coffee in the press pot. I also don’t drink the last mouthful of each mug. The sediment doesn’t really bother me, but I’d like to end each mug of coffee where the first sip tastes as good as the last sip, so I avoid the last few drops.

Troubleshooting Bad Coffee
Beginners can make some mistakes early on that may result in less-than-optimal coffee. Below is a list of some common press pot problems and my solution.
Coffee Tastes Weak
Most likely the grind is too coarse. Grind the coffee a little finer. Also, make sure you are allowing the coffee to steep for 3-4 minutes.
Coffee Tastes Bitter
The coffee may have been ground too fine. Next time use a coarser grind. If the coffee is dark roasted, make sure the coffee is fresh and lower the brewing temperature to 195 F.
Coffee Taste Too Strong
Use a 3 minute steep. Don’t let the brewed coffee sit inside the glass beaker brewing. Move it from the press pot to a thermal container or just brew what you need. Also note that if you’ve been accustomed to drinking drip coffee, press pot coffee will taste richer (stronger) at first.
Gritty/Thick Sediment
This could be a problem with the filter. If the filter doesn’t fit snug against the glass, coffee sediment will go into the upper chamber. Filters can become damaged. You can purchase replacement filters.
Sediment Woes
If everything tastes right, but the sediment is bothering you then consider purchasing the Espro Press, which has a tighter filter than traditional French Press coffee brewers. Another option is to cut up a paper filter as shown in this hack.
Water Takes Too Long to Boil
I feel your pain. Only boil the amount needed for your press pot. In other words, don’t completely fill your kettle. If heating the water still takes too long, consider getting an electric kettle. An electric kettle is one of the best investments you can make.

Inconsistent Grind
My guess is you have one of those $20 blade grinders. Some of the coffee is coarsely ground and some is ground fine. Getting an excellent grind from a blade grinder takes practice. Buying a burr grinder is ultimately a better solution.

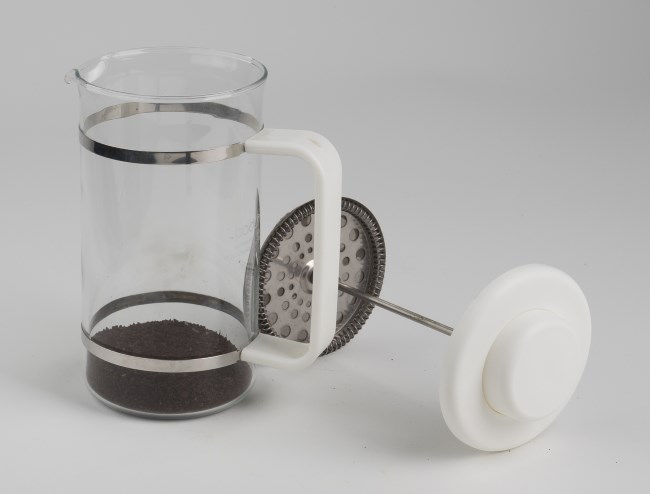
The stainless steel french press is easy to disassemble and clean. Although it’s not necessary to disassemble before cleaning, every so often you would want to give your press pot a complete cleaning. For more instructions read Keeping Your French Press Clean. For day to day cleaning, I just give my brewer a quick rinse. Every so often, I will disassemble the parts and do a more thorough cleaning.
Final Thoughts
Once you’ve dialed in the grind and the dosage, the French Press is a very easy way to make great coffee. if you don’t have a French Press already, check out Buying a French Press – Picking the Right One. You can also use the French Press to make Cold Brew Coffee.
Espro Press French Press – High-end French Press with an excellent filter – (Amazon USA, Amazon UK, Amazon Canada)
Buying a French Press – Picking the Right One – INeedCoffee guide to figuring out which French Press is best for you.
eBay French Press Page – eBay has many affordable French Press coffee brewers.
Michael Allen Smith
Latest posts by Michael Allen Smith (see all)
- Stagg Pour-Over Coffee Dripper Review and Tutorial - November 30, 2017
- The Upside Down AeroPress Coffee Brewing Tutorial - November 27, 2017
- French Press Tabletop Coffee and Tea Maker with Bru Stop Technology Review - November 25, 2017
About Michael Allen Smith
Michael Allen Smith is both a coffee fanatic and a web developer. In April 1999, he combined these two interests and started the coffee website INeedCoffee.com.
Primary Sidebar
Essential Coffee Gear

Start your next Amazon purchase here. It helps INeedCoffee and costs you nothing extra.


Search
Monthly Newsletter
Sign up here to receive our newsletter delivered by MailChimp.
Bodum 10709-16 Instructions For Use Manual
Related Manuals for Bodum 10709-16
Summary of Contents for Bodum 10709-16
10709-16/10709 BisTRo TOASTeR TOASTeR GRILLe-PAIN BRØDRISTeR TOSTADOR TOSTAPANe BROODROOSTeR BRÖDROSTeN TORRADeIRA LeIVÄNPAAHDIN ТОСТЕР トースター Instruction for use ENGlisH Gebrauchsanweisung dEUTsCH Mode d’emploi fRANÇAis Brugsanvisning dANsk Instrucciones de uso EspAñol Istruzioni per l’uso iTAliANo Gebruiksaanwijzing NEdERlANds Bruksanvisning sVENskA Manual de Instruções poRTUGUÊs.
Page 3: Important Safeguards
Welcome to BodUM ® Congratulations! You are now the proud owner of a BISTRO Toaster from BODUM . Before using the ® Toaster read these instructions carefully. IMPORTANT SAFEGUARDS – Before operating this appliance for the first time, read all instructions. Failure to observe the instructions and safety notes may result in hazardous conditions.
Never immerse the item in water: Only clean the appli- ance using a damp cloth. Remember this is an electrical appliance. – To protect against fire, electric shock and injury to persons do not immerse cord or plugs in water or other liquid.
FOR HOUSEHOLD USE ONLY dEsCRipTioN of AppliANCE A Variable browning setting knob B Defrost button C Stop button D Control lever/ high rise e Variable width toasting slots F Rack for bread/ bagels/ croissants G Lift button for the racks H Slide out crumb tray I Cord storage K Power cord.
UsiNG THE ToAsTER – ensure control lever (D) is raised. – Plug (K) into a suitable mains supply socket. – Insert up to two slices of bread into toasting slots (e). – Turn the variable browning setting knob (A) dial to required setting.
ClEANiNG ANd MAiNTENANCE – Always remove plug from the power outlet, before cleaning. – To clean the inside, turn toaster upside down over the sink and gently shake. – The crumb tray (H) should be emptied regularly as a build-up of crumbs could be a potential fire hazard. After toasting, allow the toaster to cool down thorough- ly, and then slide out the crumb tray (H) and empty.
GS, Ce, UL, CUL sERViCE & GUARANTEE CoNdiTioNs All BODUM products are made of high-quality, durable ® materials. However, should parts require replacement, please contact one of the following: your BODUM dealer ® - the BODUM SHOP - the BODUM representative in your ®.
Willkommen bei BodUM ® Herzlichen Glückwunsch! Sie sind nun stolzer Besitzer eines BISTRO Toaster von BODUM . Lesen Sie diese ® Anleitung sorgfältig durch, bevor Sie den Toaster verwenden. WICHTIGE SICHERHEITSHINWEISE – Bitte lesen Sie diese Anleitung vollständig, bevor Sie das Gerät das erste Mal verwenden.
– Versuchen Sie nie, das Netzkabel des Geräts selber auszu- tauschen. Hierfür sind spezielle Werkzeuge erforderlich. Um die Sicherheit des Geräts zu gewährleisten, dürfen Reparaturen am Kabel und der einbau eines neuen Kabels ausschliesslich von einer durch den Hersteller autorisierten Kundendienstwerkstatt erfolgen. –.
NUR ZUR VERWENDUNG IM HAUSHALT GEEIGNET AUfBAU dEs ToAsTERs A Bräunungseinstellung B Auftautaste C Stopptaste D Betätigungshebel / Auswurfmechanismus e Toastschlitze mit variabler Breite F Aufsatz für Brote / Brötchen / Croissants G Taste zum Anheben des Aufsatzes H herausziehbares Krümelfach I Kabelhalterung K Netzkabel iNsTAllATioN.
WARNUNG: Das Zeichen «heisse Obflächen» ist oben auf dem Toaster als Warnhinweis angebracht! Seien Sie vorsichtig mit heissen Oberflächen! Der Kontakt mit heissen Oberflächen kann zu Verbrennungen führen. so VERWENdEN siE dEN ToAsTER – Der Betätigungshebel (D) muss oben stehen. –.
kABElHAlTERUNG VERWENdEN – Überschüssiges Netzkabel (K) kann um die Kabel - halterung (I) im Gerätefuss aufgewickelt werden. WARTUNG UNd pflEGE – Ziehen Sie vor der Reinigung immer den Stecker aus der- Netzsteckdose. – Um das Innere des Toasters zu reinigen, drehen Sie das Gerät über dem Spülbecken auf den Kopf und schütteln Sie es vorsichtig.
– Schieben Sie nicht (gewaltsam) Dinge in den Toaster, die zu gross für die Schlitze sind. – Führen Sie keine Gabeln oder anderes Besteck in den Toaster ein, um Brot herauszuholen. Sie können so die Heizwindungen des Geräts beschädigen. Sollten ein- mal Dinge im Toaster hängen bleiben, ziehen Sie den Netzstecker aus der Steckdose, drehen Sie das Gerät und schütteln Sie es vorsichtig.
& GARANTiEBEdiNGUNGEN Alle BODUM Produkte werden aus hochwertigen, langlebig- ® en Materialien gefertigt. Müssen Teile jedoch einmal ersetzt Händler, werden, wenden Sie sich bitte an Ihren BODUM ® ein BODUM Geschäft, die BODUM Generalvertretung in ® ® Ihrem Land oder besuchen Sie: www.bodum.com Garantie.
Bienvenue chez BodUM ® Félicitations! Vous avez fait un excellent choix en achetant un grille-pain BISTRO de BODUM . Lisez ® attentivement les instructions qui suivent avant d’utiliser l’appareil IMPORTANTES CONSIGNES DE SECURITE – Lisez toutes les instructions avant d‘utiliser l‘appareil pour la première fois.
– en cas d‘anomalie ou de dysfonctionnement, mettez l‘appareil hors tension; n‘essayez pas d‘effectuer la répa- ration vous-même. Confiez toujours l‘appareil à un ate- lier de réparation agréé par le fabricant. Le non-respect des prescriptions décrites ci-dessus peut compromettre la sécurité.
EXCLUSIVEMENT DESTINÉ À UN USAGE MÉNAGER dEsCRipTioN dE l’AppAREil A Bouton de sélection du degré de brunissage B Bouton décongélation C Bouton d’arrêt D Levier de commande/fonction surélévation e Fentes à largeur variable F Support pour pain /bagels/croissants G Bouton de commande du support H Tiroir ramasse-miettes I Range-cordon K Cordon d’alimentation.
UTilisATioN dU GRillE-pAiN – Assurez-vous que le levier de commande (D) est en position haute. – Branchez la fiche (K) dans une prise de courant adéquate. – Placez jusqu’à deux tranches de pain dans les fentes de l‘appareil (e). – Tournez le bouton de réglage du degré de brunissage (A) sur la position souhaitée.
ENTRETiEN ET MAiNTENANCE – Retirez toujours la fiche de la prise avant de nettoyer l’appareil. – Pour nettoyer l’intérieur, retournez l’appareil au-dessus de l’évier et secouez-le doucement. – Le ramasse-miettes (H) doit être débarrassé régulière- ment de son contenu car l’accumulation de miettes peut repré-senter un risque d’incendie.
Dimensions de la fente (L/B) ca.14cm/3cm - 5.5inch/1.2inch Certifications GS, Ce, UL, CUL sERViCE ApRÈs-VENTE & GARANTiE Tous les produits BODUM sont fabriqués avec des maté- ® riaux de qualité très solides. S’il fallait quand même remplacer certaines pièces, vous trouveriez tous les renseignements nécessaires auprès de votre revendeur.
Velkommen hos BodUM ® Tillykke! Du er nu den heldige ejer af en BISTRO-brød- rister fra BODUM . Læs brugsanvisningen omhyg- ® geligt, inden brødristeren tages i brug første gang. VIGTIGE SIKKERHEDSREGLER – Læs alle instruktionerne, inden apparatet tages i brug første gang.
– Tag altid stikket ud af stikkontakten, når du ikke bruger apparatet, eller når det skal rengøres. Apparatet må ikke nedsænkes i vand: Dette er vigtigt at huske på i forbin- delse med elektriske apparater. Rengørkun apparatet ved hjælp af en børste eller fugtig klud. –.
BEskRiVElsE Af BRØdRisTEREN A Knap til variabel indstilling af ristestyrke B Optøningsknap C Stopknap D Kontrolgreb e Rist med variabel bredde F Rist til brød/bagels/croissanter G Hæveknap til rist H Aftagelig krummebakke I Ledningsopbevaring K Ledning iNsTAllATioN – Placer apparatet på et stabilt, plant underlag, som ikke må.
BRUG Af BRØdRisTEREN – Sørg for, at kontrolgrebet (D) er hævet. – Slut ledningen (K) til en passende stikkontakt. – Kom to stykker toast i brødristeren (e). – Drej knappen til variabel indstilling af ristestyrke (A) til den ønskede indstilling. (1=lys, 5=mørk) –.
– Brug en blød fugtig klud til at tørre ydersiden af brød- risteren med, og tør efter med en blød, tør klud. – Brug aldrig kemikalier, ståluld eller slibemidler til rengøring af brødristerens yderside. – Brødristeren må ikke sænkes ned i vand. –.
Alle BODUM produkter er fremstillet af holdbare højkva- ® litetsmaterialer. Skulle det alligevel blive nødvendigt at udskifte dele, står efterfølgende steder gerne til rådig- hed med nærmere oplysninger: Deres BODUM forhand- ® ler - BODUM SHOP - BODUM agenturer i de enkelte lande, ®.
Bienvenido a BodUM ® ¡ Felicitaciones! Usted es ahora el/la feliz propietario/a de un tostador BISTRO de BODUM . Le rogamos lea ® atentamente estas instrucciones antes de usar el tostador. MEDIDAS IMPORTANTES DE SEGURIDAD – Antes de usar el molinillo de café por primera vez, le rogamos lea atentamente todas estas instrucciones.
aparato, todo cambio o reparación del cable deben ser realizados exclusiv-amente por un centro de servicio de postventa autorizado por el fabricante. – Desenchufe siempre el aparato de la toma cuando no lo usa y antes de proceder a la limpieza. Para la limpieza, utilice un cepillo o un paño húmedo.
PARA USO EXCLUSIVAMENTE DOMÉSTICO dEsCRipCiÓN dE ApARATo A Selector del nivel de tostado B Botón de descongelación C Botón de parada D Palanca de control / elevación e Ranuras de ancho variable F Rejilla integrada para calentar pan, bollos y croissants G Botón elevador de rejilla H Bandeja recogemigas extraíble I Compartimiento recogecable.
Uso dEl TosTAdoR – Compruebe que la palanca de control (D) está levantada. – Conecte el enchufe (K) a una toma de corriente adec- uada. – Introduzca dos rodajas de pan en cada ranura de tostado (e). – Gire el selector de nivel de tostado (A) según su preferen- cia.
liMpiEzA y CUidAdos – Desconecte siempre el enchufe de la toma de corriente antes de limpiar el aparato. – Para limpiar el interior, gire el tostador boca abajo sobre el fregadero y agítelo suavemente. – La bandeja recogemigas (H) se debe vaciar regularmente porque una acumulación de migas podría provocar un incendio.
Las reparaciones se harán sin coste alguno siempre que se cumplan los requisitos de la garantía. Requisitos de la garantía: el vendedor debe rellenar el cer- tificado de garantía en el momento de la compra. Sólo los representantes autorizados de BODUM pueden ® llevar a cabo reparaciones en garantía.
Benvenuti alla BodUM ® Complimenti per aver scelto un tostapane BISTRO di BODUM . Prima di utilizzare il tostapane, leggere ® attentamente le presenti istruzioni. AVVERTENZE IMPORTANTI PER LA SICUREZZA – Prima di mettere in funzione questo apparecchio per la prima volta, leggere tutte le istruzioni.
– Non cercare mai di sostituire il cavo di alimentazione dell‘apparecchio, dato che per tale lavoro occorrono utensili speciali. Per garantire un funzionamento sicuro dell‘apparecchio, se il cavo deve essere riparato o sostitu- ito, tale lavoro deve essere eseguito esclusivamente da un punto di assistenza tecnica autorizzato dal produttore.
SOLO PER USO DOMESTICO dEsCRizioNE dEll‘AppARECCHio A Manopola di controllo della tostatura variabile B Pulsante scongelamento C Pulsante di arresto D Leva di comando/sollevamento fette e Fenditure per la tostatura a larghezza variabile F Griglia per scaldare pane/panini/croissant G Pulsante di sollevamento griglia H Cassetto raccoglibriciole I Vano avvolgicavo K Cavo di alimentazione.
Uso dEl TosTApANE – Accertarsi che la leva di comando (D) sia sollevata. – Collegare (K) ad una presa di alimentazione adeguata. – Non inserire più di due fette di pane nelle fenditure del tostapane (e). – Ruotare la manopola di controllo della tostatura (A) sull‘ impostazione desiderata.
pUliziA E MANUTENzioNE – Prima di procedere alla pulizia del prodotto, staccare la spina dalla presa di corrente. – Per pulire la parte interna dell‘apparecchio, capovolgere il tostapane sul lavello e scuoterlo delicatamente. – Svuotare regolarmente il cassetto raccoglibriciole (H) poiché.
Condizioni di garanzia. Il certificato di garanzia deve esse- re compilato in ogni sua parte dal rivenditore al momento dell’acquisto. Le riparazioni in garanzia devono essere eseguite esclusiva- mente dai centri autorizzati dalla BODUM ® La BODUM non si assume alcuna responsabilità per i danni ®.
Welkom bij BodUM ® Proficiat met de aanschaf van dit BISTRO-broodrooster van BODUM ! Lees voordat u het broodrooster gaat ® gebruiken eerst zorgvuldig deze instructies. BELANGRIJKE VEILIGHEIDSAANWIJZINGEN – Lees alle instructies goed door, voordat u het appa- raat voor de eerste keer gebruikt. Als de instructies en veiligheidsaanwijzingen niet worden aangehouden, kun- nen gevaarlijke situaties ontstaan.
– Probeer nooit de stroomkabel van het apparaat zelf te vervangen, omdat hiervoor speciaal gereedschap nodig is. Om de veiligheid van het apparaat te waarborgen mag de kabel, indien nodig, alleen door een klantenservice- center gerepareerd of vervangen worden dat door de fabrikant hiertoe geautoriseerd is.
UITSLUITEND VOOR HUISHOUDELIJK GEBRUIK BEsCHRiJViNG VAN HET AppARAAT A Bruiningsregelaar B Ontdooiknop C Stopknop D Bedieningshendel / naheffen e Roosteropeningen met variabele breedte F Beugel voor stokbrood / broodjes / croissants G Schuif voor broodjesbeugel H Uitschuifbare kruimellade I Opbergvoorziening voor aansluitsnoer K Aansluitsnoer iNsTAllATiE –.
BEdiENiNG – Zorg dat de bedieningshendel (D) omhoog staat. – Steek de stekker (K) in een geschikt stopcontact. – Plaats twee boterhammen in de roosteropeningen (e). – Zet de bruiningsregelaar (A) in de gewenste stand. (1 = licht geroosterd, 5 = donker geroosterd) –.
REiNiGiNG EN oNdERHoUd – Trek alvorens het apparaat schoon te maken altijd eerst de stekker uit het stopcontact. – Houd het rooster omgekeerd boven de gootsteen en schudt het rustig heen en weer om broodresten en krui- mels te verwijderen. –.
Voorwaarden voor garantievergoedingen. Het garan- tiebewijs moet door het verkooppunt op het tijdstip van aankoop compleet worden ingevuld. Garantievergoedingen mogen alleen op door BODUM ® erkende punten worden uitgevoerd. BODUM geeft geen garantie voor schade die toe te schri- ®.
Välkommen till BodUM ® Grattis! Du är nu stolt ägare till brödrosten BISTRO från BODUM . Läs instruktionerna noga innan du ® använder brödrosten. VIKTIGA SÄKERHETSFÖRESKRIFTER – Läs alla instruktioner innan du använder denna apparat första gången. Om du inte följer instruktioner och säker- hetsråd kan fara uppstå.
– Dra ur kontakten när du inte använder kvarnen och när den ska rengöras. Sänk inte ner kvarnen i vatten: tänk på att den är en elektrisk apparat. Rengör kvarnen med en borste eller fuktig trasa. – För att skydda sig från brand, elektrisk chock eller personskada, sänk aldrig ner sladden eller kontakten i vatten eller annan vätska.
ENDAST FÖR HUSHÅLLSÄNDAMÅL BEskRiVNiNG AV ENHETEN A Reglage för rostningsstyrka B Upptiningsknapp C Stoppknapp D Kontrollgrepp e Rostar med variabel bredd F Rost för bröd/ bagel/ croissant G Lyftknapp till rostarna H Utdragbar bricka för smulor I sladdvinda K sladd iNsTAllERiNG –.
ANVÄNdA BRÖdRosTEN – Se till att kontrollgreppet (D) är lyft. – Anslut (K) till ett lämpligt uttag. – Sätt i upp till två brödskivor i rostarna (e). – Vrid reglaget för roststyrka (A) till önskad inställning. (1=ljusast, 5=mörkast) – Tryck ned kontrollgreppet (D) tills det låser sig. –.
RENGÖRiNG oCH UNdERHåll – Dra alltid ur sladden ur uttaget före rengöring. – För att rengöra insidan, vänd brödrosten upp och ner över vasken och skaka försiktigt. – Smulbrickan (H) ska tömmas regelbundet då ansamling av smulor kan vara en brandrisk. Låt brödrosten svalna ordentligt efter användning och ta sedan ut smulbrickan (H) och töm den.
Page 52: Tekniska Data
GS, Ce, UL, CUL sERViCE- oCH GARANTiBEsTÄMMElsER Alla BODUM -produkter tillverkas av högkvalitativa, tåliga ® material. Om du trots det måste byta delar, ger gärna någon av följande ställen mer information: Din BODUM ® återförsäljare, BODUM SHOP, BODUM -representanten i ®.
Bem vindo ao BodUM ® Parabéns! Você é agora um orgulhoso dono da torradeira BISTRO da BODUM . Antes de utilizar a ® Torradeira leia as instruções com atenção. INDICAÇÕES DE SEGURANÇA IMPORTANTES – Antes de utilizar este equipamento pela primeira vez, leia todas as instruções.
– Nunca tente substituir o cabo de alimentação do equipa- mento, uma vez que são necessárias ferramentas espe- ciais para esse fim. Para garantir a segurança regular do equipamento, se o cabo necessitar de ser reparado ou trocado, leve-o a uma oficina do serviço ao cliente auto- rizada pelo fabricante, onde essa operação deverá.
PARA UTILIZAR APENAS EM CASA dEsCRiÇÃo do UTENsílio A Termóstato regulável B Botão de descongelamento C Botão de stop D Manípulo de controlo / elevação extra e Fendas de largura variável F Suporte para aquecimento de pão/bagels/croissants G Botão de elevação dos suportes H Gaveta recolhe-migalhas I enrolador de cabo K Cabo de alimentação.
ATENÇÃo: O aviso (superfície quente) é colocado no cimo da torradeira! Tenha cuidado com as superfícies quentes! O contacto com superfícies quentes pode causar queimaduras. UTilizAR A ToRRAdEiRA – Certifique-se que (D) está levantada. – Ligue (K) a uma tomada apropriada. –.
liMpEzA E MANUTENÇÃo – Desligue sempre a ficha da tomada antes de iniciar a limpeza. – Para limpar o interior, vire a torradeira ao contrário sob um lavatório e agite levemente. – A bandeja de migalhas (H) deve ser esvaziada regularmente, visto que o excesso de migalhas significa um potencial in- cêndio.
(L/B) ca.14cm/3cm - 5.5inch/1.2inch Controlado por GS, Ce, UL, CUL CoNdiÇÕEs dE AssisT NCiA E GARANTiA Todos os produtos BODUM são fabricados com materiais ® de alta qualidade e duradouros. Se ainda assim tiver que ser substituída alguma peça, podem ser obtidas informações.
Tervetuloa toivottaa BodUM ® Onneksi olkoon! Voit olla ylpeä hankkimastasi BODUM®-BISTRO-leivänpaahtimesta. huolella nämä ohjeet, ennen kuin ryhdyt käyttämään leivän- paahdinta. TÄRKEITÄ TURVAOHJEITA – Tutustu näihin ohjeisiin ennen laitteen ensimmäistä käyttökertaa. Ohjeiden ja turvallisuusvihjeiden noudat- tamatta jättäminen voi johtaa vaaratilanteisiin. – Kun olet ottanut laitteen pois pakkauksesta, tarkasta se mahdollisten vaurioiden varalta.
edellyttää, että virtajohdon korjauksen ja uuden virtajo- hdon asentamisen saa suorittaa vain valmistajan valtuut- tama huoltoliike. – Irrota laite verkosta käytön jälkeen ja ennen kuin ryhdyt puhdistamaan sitä. Älä koskaan kasta laitetta veteen: puhdista laite vain kosteaa liinaa käyttäen. Muista aina, että.
SUUNNITELTU VAIN KOTITALOUSKÄYTTÖÖN lEiVÄNpAAHdiN MAlli A Paahtoaste B Sulatus C Seis-painike D Käyttövipu / leivän poisto e Paahdinaukko eri leveyksillä F Lämpöalusta G Lämpöalustan nostopainike H Ulosvedettävä murukaukalo I Virtajohdon pidike K Verkkojohto AsENNUs – Aseta laite vakaalle ja tasaiselle alustalle, joka ei kuumene eikä.
VARoiTUs: Varoitus «Pinnat kuumettuvat» on kiinnitetty leivänpaahtimen päälle! Ole varovainen kuumien pintojen kanssa! Kuumat pinnat voivat aiheuttaa palovammoja. NÄiN kÄyTÄT lEiVÄNpAAHdiNTA – Käyttövivun (D) täytyy olla ylhäällä. – Aseta pistoke (K) pistorasiaan. – Laita kaksi leipäviipaletta paahdinaukkoon (e). – Aseta haluamasi paahtoaste paahtoasteensäätimellä (A). (1 = vaalea, 5 = tumma).
– Jos haluat puhdistaa laitteen sisältäpäin, käännä se nurinperin huuhtelualtaan päälle ja ravista murut varov- asti ulos. – Murukaukalo (H) on tyhjennettävä säännöllisesti, koska liiallinen kuumentunut murumäärä voi aiheuttaa tuli- palovaaran. Anna leivänpaahtimen jäähtyä kunnolla käytön jälkeen Vedä sen jälkeen murukaukalo (H) ulos ja tyhjennä.
(P/L) n.14cm/3cm - 5.5inch/1.2inch Hyväksynnät GS, Ce, UL, CUL HUolTo & TAkUUEHdoT Valmistamme kaikki BODUM -tuotteet huippulaaduk- ® kaasta ja pitkäikäisestä materiaalista. Mikäli jokin osa on vaihdettava, ota yhteyttä maasi BODUM -jälleenmyyjään, ® BODUM -myymälään, BODUM -edustajaan tai käy kotisi- ® ®.
Page 66
Page 68
Page 70
Page 73
Page 75
Page 77
Page 79
Page 81
& sHop-iN-sHop ® AUSTRALIA BELGIUM No.99, Qinxian North Street, Taiyuan SHOP-IN-SHOP BODUM ® OUTLET Parkson Department Store, No. Galerie, Bondi Junction (NSW) Maasmechelen Village 189, Qinxian North Street, Taiyuan Il Mondo, Townsville (QLD) Shop number 96 Chicago Coffee, 36 Times Avenue.
One Utama Shopping Centre (New Karstadt Bremen Wing) Karstadt Nürnberg ITALY Isetan Departmental Store, 3rd Möbel Hesse BODUM ® STORE floor Kuala Lumpur City Centre Lorey, Frankfurt Via di San Francesco a Ripa, 141 Robinsons Departmental Store, ONLINE SHOP GERMANY 2nd floor 00153 Roma www.bodum.com.
& sHop-iN-sHop ® SPAIN FACHHANDELS-PARTNER Landolt Kaffee, Kirchstrasse 9, Westschweiz 8752 Näfels BODUM ® OUTLET Boutique la Ballade, Cucina Pero, Zugerstrasse 33, Las Rozas Village - loc. 46 Centre commercial, Signy 8820 Wädenswil C/ Juan Ramón Jiménez, 3 BUTIK für Küche und Wohnen.
Bodum French Press Instructions Manual

Synopsis: Make great tasting coffee with the Bodum French Press. Step by Step instructions as indicated in the user manual.
2. For each 1.25 dl, 4 oz cup, put 1 rounded tablespoon or 1 BODUM scoop of coarse ground coffee into the pot. CAUTION: Use only coarse ground coffee. Fine grind can clog the filter and create high pressure. Place coffee maker on a heat proof, non-slip surface.
3. Pour hot (not boiling) water into the pot. Leave a minimum of 2.5 cm, 1 inch of space at the top. Stir the brew with a plastic spoon. CAUTION: Metal spoons can scratch or chip the glass beaker and cause breakage.
4. Place the plunger unit on top of the pot. Turn the lid to close off the pour spout opening (does not apply to the Brazil models). Do not press down. Let the coffee brew for at least 4 minutes.
5. Hold the pot handle firmly with the spout turned away from you, then using just the weight of your hand, apply slight pressure on top of the knob to lower the plunger straight down into the pot. Lowering the plunger slowly with minimal pressure produces best results. If the filter clogs or it becomes difficult to push down the plunger you should remove the plunger from the pot, stir the brew and then slowly plunge again. WARNING: Using excessive force can cause scalding liquid to shoot out of the pot.
6. Turn the lid to open the pour spout and then pour coffee.
7. Unscrew the filter assembly and clean the plunger unit after each use. All parts are dishwasher safe.
Bodum Bistro 11001 Instructions For Use Manual
Related Manuals for Bodum Bistro 11001
Summary of Contents for Bodum Bistro 11001
11001 BISTRO POUR OVER COFFEE MACHINE AUFBRÜH-KAFFEEMASCHINE CAFETIèRE FIlTRE AUTOMATIqUE KAFFEBRYGGER MED OVERHÆlDNING CAFETERA DE FIlTRO CAFFETTIERA AUTOMATICA PER INFUSIONE FIlTER-KOFFIEzETAPPARAAT AUTOMATISK STRIlKAFFEBRYGGARE CAFETEIRA COM FIlTRO KAHVINKEITIN POUR OVER -TEKNIIKAllA КАПЕЛЬНАЯ КОФЕВАРКА Instruction for use ENGlISH Gebrauchsanweisung DEUTSCH Mode d’emploi FRANÇAIS Brugsanvisning DANSK.
Page 3: Important Safety Instructions
Welcome to BODUM ® Congratulations! You are the proud owner of a BISTRO pour over coffee machine from BODUM . Read through these instructions carefully ® before you use the pour over coffee machine. IMPORTANT SAFETY INSTRUCTIONS – Read all of the information before you use the appliance for the first time.
– The appliance must never be switched on without the coffee shower (11) and filter holder (6). – Avoid contact with the steam that is generated during the brewing process. Otherwise there is a risk of scalding. – Scalding may occur if the lid is removed during the brewing cycles. –.
Page 5: Important Information
12 Large stopper 13 Small stopper 14 Safety switch 15 ON/OFF switch & scale indication 16 BODUM measuring spoon IMPortAnt InforMAtIon POWER CABLE – The appliance is supplied with a short power cable in order to reduce the risk of persons becoming entangled or tripping over a long cable.
(6) with inserted coffee filter (7) carefully out of the hous- ing (1) of the pour over coffee machine. In order to make a jug of coffee fill the coffee filter (7) with approx. 8 BODUM measuring spoons (16) of ®.
– Guide the thermos jug (8) into the pour over coffee machine with the dosage lid (9) and lid cap (10) in place. Ensure that the thermos jug (8) is positioned precisely beneath the filter holder (6). Note: The safety switch (14) detects the thermos jug (8) when it is in place in the appliance.
Page 8: Maintenance And Care
– For simple cleaning unscrew the dosage lid (9) from the thermos jug (8). Rinse the thermos jug (8) thoroughly with warm water after use. Warning: The thermos jug (8) is not suitable for washing in the dishwasher. Do not immerse the thermos jug in water. –.
Page 9: Technical Data
cLeAnInG tHe coffee sHoWer The coffee shower (11) can be cleaned and de-scaled separately. In order to do so remove the housing lid (5) from the housing (1) of the pour over coffee machine. Then lift the coffee shower (11) carefully vertically, up and out of the pour over coffee machine.
& WArrAntY conDItIons All BODUM products are produced from high quality, durable materials. ® However, if it should be necessary to replace parts please contact your BODUM ® dealer, a BODUM shop, the general BODUM representative in your country or ®.
Page 11: Wichtige Sicherheitshinweise
Willkommen bei BoDuM ® Herzlichen Glückwunsch! Sie sind stolze(r) Besitzer(in) einer BISTRO- Aufbrüh-Kaffeemaschine von BODUM . Lesen Sie diese Anleitung sorg- ® fältig, bevor Sie die Aufbrüh-Kaffeemaschine verwenden. WICHTIGE SICHERHEITSHINWEISE – Lesen Sie alle Hinweise, bevor Sie das Gerät zum ersten Mal verwenden. Das Nichteinhalten der Anweisungen und Sicherheitshinweise kann zu gefährli-.
– Wird Abdeckung während Brühzyklus entfernt, besteht verbrühungsgefahr. – Kochendes Wasser kann verbrennungen verursachen. – Achten Sie darauf, dass die EIN/AUS-Taste (15) stets frei zugänglich ist. – Tauchen Sie das Gerät nie in Wasser: Denken Sie daran, dass es sich um ein Elektrogerät handelt.
12 Stopfen gross 13 Stopfen klein 14 Sicherheitsschalter 15 EIN/AUS-Taste & Entkalkungs -Warnleuchte 16 BODUM-Masslöffel BesonDere HInWeIse NETZKABEL – Es wird ein kurzes Netzkabel mitgeliefert, um die Gefahr zu verringern, dass Sie sich in einem langen Kabel verheddern oder darüber stolpern.
– Entnehmen Sie die Thermoskanne (8) aus der Aufbrüh-Kaffeemaschine. Ziehen Sie nun den Filterträger (6) mit eingelegtem Kaffeefilter (7) vorsichtig aus dem Gehäuse (1) der Aufbrüh-Kaffeemaschine. Für eine Kanne Kaffee füllen Sie den Kaffeefilter (7) mit ca. 8 BODUM -Masslöffel (16) mittelfein ®.
– Führen Sie die Thermoskanne (8) mit montiertem Dosierdeckel (9) und Deckelkappe (10) in den Kaffee-bereiter ein. Achten Sie darauf, dass die Thermoskanne (8) genau unterhalb des Filterträgers (6) positioniert ist. Hinweis: Der Sicherheitsschalter (14) erkennt, ob sich die Thermoskanne (8) im Gerät befindet.
– Für eine einfache Reinigung schrauben Sie den Dosierdeckel (9) von der Thermoskanne (8) ab. Spülen Sie die Thermoskanne (8) nach Gebrauch mit warmem Wasser gründlich aus. Achtung: Die Thermoskanne (8) ist nicht für die Spülmaschine geeignet. Die Thermoskanne nicht in Wasser tauchen. –.
Page 17: Technische Daten
KAffeeDuscHe reInIGen – Die Kaffeedusche (11) lässt sich auch separat reinigen und entkalken. Nehmen Sie hierzu den Gehäusedeckel (5) vom Gehäuse (1) der Aufbrüh- Kaffeemaschine ab. Anschliessend heben Sie vorsichtig die Kaffeedusche (11) senkrecht aus der Aufbrüh-Kaffeemaschine. Nun entfernen Sie den Stopfen gross (12) und den Stopfen klein (13) durch langsames Herausziehen aus der Kaffeedusche.
-Händler, ein BODUM -Geschäft, die BODUM ® ® ® Generalvertretung in Ihrem Land, oder besuchen Sie www.bodum.com. Garantie: BODUM gibt auf die “BISTRO”-Aufbrüh-Kaffeemaschine eine 2-jährige ® Garantie ab Kaufdatum für Materialfehler oder Funktionsstörungen, die auf Fehler in Herstellung oder Entwurf zurückzuführen sind. Wenn alle Garantiebedingungen erfüllt werden, ist die Reparatur kostenlos.
Bienvenue chez BoDuM ® Félicitations ! Vous êtes maintenant l’heureux propriétaire d’une cafetière filtre automatique BISTRO de BODUM . Lisez attentivement les instructions ® qui suivent avant d’utiliser votre appareil. IMPORTANTES CONSIGNES DE SÉCURITÉ – Lisez toutes les informations avant d’utiliser l’appareil pour la première fois.
électrique, la fiche ne peut être insérée dans une prise polarisée que dans un sens. Si la fiche ne s’insère pas complètement dans la prise, retournez-la. Si elle ne s’insère toujours pas, contactez un électricien qualifié. Ne modifiez en aucun cas la fiche.
5 Couvercle du socle 6 Porte filtre 7 Filtre à café 8 Pichet thermos 9 Bouchon doseur 10 Bouchon thermos 11 Diffuseur 12 Grand obturateur 13 Petit obturateur 14 Bouton de sécurité 15 Interrupteur ON/OFF & indicateur de tartre 16 Cuillère doseuse BODUM.
Page 22: Information Importante
InforMAtIon IMPortAnte CORDON D’ALIMENTATION – L’appareil est fourni avec un cordon d’alimentation court afin de réduire le risque de s’emmêler ou de trébucher provoqué par un long cordon. – Il est possible d’utiliser des rallonges si l’utilisation se fait avec soin. –.
(1) de la cafetière filtre automatique. Pour faire un pichet de café, ajoutez dans le filtre à café (7) environ 8 mesures de café de mouture moyenne à l’aide de la cuillère doseuse BODUM . Pour une quantité inférieure de café, ®.
Note: la cafetière filtre automatique s’éteint également automatiquement dès que le pichet thermos (8) est enlevé de l’appareil pendant la phase de prépa- ration du café. – Pour reprendre le processus de préparation du café, appuyez simplement sur le bouton ON/OFF (15) à nouveau une fois que le pichet thermos (8) a été remis en position correcte dans la cafetière filtre automatique.
entretIen et soIn DETARTRAGE DE LA CAFETIÈRE FILTRE AUTOMATIQUE – Afin de garantir un fonctionnement correct de votre cafetière filtre auto- matique, il est important de s’assurer que l’appareil ne soit pas endurci par le tartre. Le cycle optimal dépend de la dureté de l’eau, celle-ci diffère d’un pays à.
nettoYAGe Du DIffuseur A cAfe Le diffuseur (11) peut être nettoyé et détartré séparément. Pour cela, retirez avec précaution le couvercle (5) du socle (1) de la cafetière filtre automatique. Puis soulevez verticalement le diffuseur (11) avec précaution pour le retirer de la cafetière filtre automatique.
à condition que toutes les conditions de garantie soient remplies. Il ne sera effectué aucun remboursement. Conditions de garantie: le certificat de garantie doit être dûment complété par le vendeur au moment de l’achat. BODUM décline toute responsabilité ®.
BoDuM ® Tillykke! Du er den stolte ejer af en BISTRO kaffebrygger med over- hældning fra BODUM . Læs denne vejledning omhyggeligt, inden du ® bruger kaffebryggeren med overhældning. VIGTIGE SIKKERHEDSANVISNINGER – Læs alle oplysningerne omhyggeligt, før du bruger apparatet første gang.
– Undgå kontakt med den damp, der dannes under brygningen. Ellers kan der være risiko for skoldning. – Skoldning kan forekomme, hvis låget fjernes under brygningen. – Kogende vand kan forårsage forbrændinger. – Sørg for, at TÆND/SLUK-knappen (15) altid er let tilgængelig. –.
12 Stor prop 13 Lille prop 14 Sikkerhedsafbryder 15 TÆND/SLUK-knap og målestok 16 BODUM måleske vIGtIGe oPLYsnInGer LEDNING – Apparatet er udstyret med en kort ledning for at minimere risikoen for at blive viklet ind i eller snuble over en længere ledning.
– Fjern termokanden (8) fra kaffebryggeren med overhældning. Tag nu fil- terholderen (6) med det isatte kaffefilter (7) forsigtigt ud af kabinettet (1) på kaffebryggeren med overhældning. For at lave en kande kaffe, skal kaf- fefiltret (7) fyldes med ca. 8 BODUM måleskeer (16) af mellemfint-malet ®.
– Før termokanden (8), med det påsatte doseringslåg (9) og låghætte (10), ind i kaffebryggeren med overhældning. Sørg for at termokanden (8) er placeret lige under filterholderen (6). Bemærk: Sikkerhedsafbryderen (14) registrerer når termokanden (8) er på plads i apparatet. Hvis termokanden ikke er placeret korrekt i kaffebryggeren med overhældning, vil apparatet ikke tænde.
– Skru doseringslåget (9) af termokanden (8) for en simpel rengøring. Rens termokanden (8) grundigt med varmt vand efter brug. Advarsel: Termokanden (8) kan ikke vaskes i opvaskemaskine. Nedsænk ikke termokanden i vand. – For en nemmere rengøring kan låghætten (10) fjernes ved at trække den af doseringslåget (9).
Page 35: Tekniske Data
renGØrInG Af DrYPfunKtIonen Drypfunktionen (11) kan rengøres og afkalkes separat. Fjern kabinetlåget (5) fra kabinettet (1) på kaffebryggeren med overhældning for at gøre dette. Løft derefter forsigtigt drypfunktionen (11) lodret op og ud af kaffebryggeren med overhældning. Fjern nu den store prop (12) og den lille prop (13) ved at trække disse langsomt ud af drypfunktionen.
GArAntIBetInGeLser Alle BODUM produkter er fremstillet af holdbare materialer af høj kvalitet. ® Skulle der alligevel være dele, der skal udskiftes, så kontakt din BODUM ® forhandler, en BODUM -forretning, BODUM -repræsentanten i dit land, eller ® ®.
Page 37: Instrucciones De Seguridad
Bienvenido a BoDuM ® ¡Enhorabuena! Es usted el flamante propietario de la cafetera de filtro BISTRO de BODUM . Lea atentamente estas instrucciones antes de usar ® su cafetera. INSTRUCCIONES DE SEGURIDAD IMPORTANTES – Lea las instrucciones de principio a fin antes de utilizar el aparato por primera vez.
este enchufe sólo puede introducirse en una posición determinada en tomas polarizadas. Si no encaja perfectamente en la toma, déle la vuelta. Si aún así no consigue introducirlo sin forzarlo, póngase en contacto con un electricista cualificado. No modifique el enchufe de ninguna forma. –.
7 Filtro del café 8 Jarra térmica 9 Tapa dosificadora 10 Tapadera 11 Difusor 12 Tapón grande 13 Tapón pequeño 14 Interruptor de seguridad 15 Interruptor ON/OFF e indicador de acumulación de incrustaciones de calcio 16 Cacito de medida de BODUM.
InforMAcIÓn IMPortAnte CABLE DE ALIMENTACIÓN – El aparato se entrega con un cable de alimentación corto a fin de reducir el riesgo de que alguien pueda enredarse o tropezar con él. – Si se adoptan las debidas precauciones puede usarse un alargador para el cable. –.
(7) con unas 8 medidas de café medianamente molido; para medir el café. Si desea preparar menos utilice los cacitos de BODUM ® café, reduzca el número de cacitos de café. (Consulte la tabla Dosificación recomendada.) Deslice con cuidado el receptáculo del filtro (6) con el filtro.
2 Depósito de agua 3 Asa del depósito de agua 4 Tapa del depósito de agua 6 Receptáculo del filtro 7 Filtro del café 9 Tapa dosificadora 10 Tapadera 11 Difusor 12 Tapón grande 13 Tapón pequeño 16 Cacito de medida –.
– Llene el depósito de agua (2) con la solución descalcificadora o con una solu- ción de agua y vinagre (tenga cuidado de no superar la línea marcada con MAX) y coloque el difusor (11), el receptáculo del filtro (6), el filtro de café (7) (sin café.
Sin embargo, no se admitirán devoluciones. Condiciones de la garantía: el vendedor deberá cumplimentar el certificado no cubre de garantía en el momento de la compra. La garantía de BODUM ® los daños atribuibles a un uso o manejo inadecuados, al desgaste normal por el uso del aparato, a un cuidado o mantenimiento deficientes o incorrectos, o a un manejo o manipulación indebidos por parte de personas no autorizadas.
Benvenuti a BoDuM ® Congratulazioni! Ora possedete una caffettiera automatica per infusio- ne BISTRO di BODUM . Leggete attentamente queste istruzioni prima di ® utilizzare l’apparecchio. IMPORTANTI ISTRUZIONI DI SICUREZZA – Leggere tutte le informazioni prima di utilizzare per la prima volta l’elet- trodomestico.
– Non accendere l’apparecchio senza acqua. – Non riempire il serbatoio dell’acqua (2) sopra la riga MAX. – Non accendere mai l’apparecchio senza il diffusore del caffè (11) e il portafil- tro (6). – Evitare il contatto con il vapore prodotto durante l’infusione per non ustio- narsi.
Page 47: Informazioni Importanti
12 Tappo grande 13 Tappo piccolo 14 Interruttore di sicurezza 15 Pulsante ON/OFF e indicatore di incrostazione 16 Misurino BODUM InforMAZIonI IMPortAntI CAvO DI ALIMENTAZIONE – L’apparecchio è dotato di un cavo di alimentazione piuttosto corto per ridur- re al minimo il rischio che le persone possano inciampare o calpestare il cavo.
– Se viene utilizzata una prolunga, i valori nominali indicati devono corri- spondere a quelli dell’apparecchio. Se l’apparecchio è collegato a terra, la prolunga deve essere un cavo con messa a terra con almeno 3 conduttori. Non lasciare mai che un lungo cavo penzoli dal tavolo o dal piano di lavoro; i bambini non devono poter essere in grado di tirarlo e non deve esservi il rischio di inciamparvi.
(7) con circa 8 misurini BODUM ® (16) di caffè macinato fine. Per una quantità inferiore di caffè, usare una quantità minore di caffè macinato fine. (Consultare la tabella con le infor- mazioni sul “dosaggio consigliato”).
2 Serbatoio dell’acqua 3 Manico del serbatoio dell’acqua 4 Coperchio del serbatoio dell’acqua 6 Portafiltro 7 Filtro del caffè 9 Coperchio di dosaggio 10 Tappo del coperchio 11 Diffusore del caffè 12 Tappo grande 13 Tappo piccolo 16 Misurino – Per una pulizia semplice, svitare il coperchio di dosaggio (9) dalla brocca termica (8).
– Riempire il serbatoio dell’acqua (2) con la soluzione disincrostante o di acqua e aceto, senza superare la riga MAX, e collocare il diffusore (11), il portafiltro (6), il filtro del caffè (7) (senza caffè macinato) e la brocca termica (8) con il coperchio di dosaggio (9/10) inseriti nell’apparecchio nelle posizioni previste.
Page 52: Dati Tecnici
Se sono soddisfatte tutte le condizioni di garanzia, le riparazioni sono gratuite. Non è possibile richiedere rimborsi. Condizioni per la garanzia: il certificato di garanzia deve essere compilato in tutte le sue parti dal rivenditore al momento dell’acquisto. BODUM non conce- ®.
Welkom bij BoDuM ® Hartelijk gefeliciteerd! U bent nu de trotse eigenaar van een BISTRO filter-koffiezetapparaat van BODUM . Lees deze instructies zorgvuldig ® door voordat u het filter-koffiezetapparaat gebruikt. BELANGRIJKE VEILIGHEIDSVOORSCHRIFTEN – Lees eerst alle informatie voordat u het apparaat voor het eerst gebruikt. Als de instructies en de veiligheidsvoorschriften niet worden opgevolgd, kunnen gevaarlijke situaties ontstaan.
past, draai de stekker dan om. Als hij dan nog niet past, neem dan contact op met een gediplomeerd elektricien. Pas de stekker op geen enkele manier aan. – Het apparaat mag niet worden ingeschakeld zonder water. – vul het waterreservoir (2) niet verder dan de lijn MAX. –.
1 Behuizing 2 Watertank 3 Handvat van watertank 4 Deksel van watertank 5 Bovendeksel 6 Filterhouder 7 Koffiefilter 8 Thermoskan 9 Doseerdeksel 10 Kandeksel 11 Koffiesproeier 12 Grote stopper 13 Kleine stopper 14 veiligheidsschakelaar 15 AAN/UIT-knop en kalkindicator 16 BODUM maatlepel.
Page 56: Belangrijke Informatie, Koffie Zetten
BeLAnGrIJKe InforMAtIe NETSNOER – Het bij het apparaat geleverde netsnoer is kort om risico’s op knopen en struikelen te verminderen. – Een verlengsnoer kan worden gebruikt, als daar voldoende zorgvuldig mee om wordt gegaan. – Als een verlengsnoer wordt gebruikt, moet het nominale vermogen van dat snoer minimaal minimaal gelijk zijn aan dat van het apparaat.
– verwijder de thermoskan (8) uit het koffiezetapparaat. Haal nu voorzichtig de filterhouder (6) met daarin het koffiefilter (7) uit de behuizing (1) van het filter-koffiezetapparaat. Als u een kan koffie wilt zetten vult u het kof- fiefilter (7) met ongeveer 8 BODUM maatlepels (16) filtermalingkoffie. Pas ®.
2 Waterreservoir 3 Handvat van waterreservoir 4 Deksel van waterreservoir 6 Filterhouder 7 Koffiefilter 9 Doseerdeksel 10 Kandeksel 11 Koffiesproeier 12 Grote stopper 13 Kleine stopper 16 Maatlepel – Snel schoonmaken: schroef het doseerdeksel (9) los van de thermoskan (8). Spoel de thermoskan (8) na gebruik grondig schoon met warm water.
– Spoel naderhand de afzonderlijke onderdelen grondig af met koud water en laat het apparaat ten minste twee keer doorlopen met koud, helder water. voordat u het apparaat laat doorlopen, moet u controleren of alle onderde- len op de juiste manier zijn teruggeplaatst in het koffiezetapparaat. –.
Page 60: Technische Gegevens
Reparaties worden gratis uitgevoerd als aan alle garantievoorwaarden is vol- daan. Restitutie is niet mogelijk. Garantievoorwaarden: het garantiecertificaat moet volledig worden ingevuld door de verkoper ten tijde van de aankoop. De garantie van BODUM dekt ® geen schade die is veroorzaakt door onjuist gebruik, normale slijtage, onvol- doende of onjuist onderhoud, oneigenlijk gebruik, of gebruik door onbevoeg- de personen.
BoDuM ® Gratulerar! Du är nu den stolta ägaren till en BISTRO automatisk stril- kaffebryggare från BODUM . Läs dessa anvisningar noggrant innan du ® börjar använda din automatiska kaffebryggare. VIKTIGA SÄKERHETSANVISNINGAR – Läs all information innan du börjar använda apparaten för första gången.
– Apparaten får aldrig kopplas in utan strilhuvudet (11) och filterhållaren (6) på plats. – Undvik kontakt med ångan som uppstår medan kaffet bryggs. Annars finns det risk att du skållar dig. – Du kan även skålla dig om du avlägsnar locket medan bryggning pågår. –.
1 Hölje 2 vattenbehållare 3 vattenbehållarens handtag 4 vattenbehållarens lock 5 Höljets lock 6 Filterhållare 7 Kaffefilter 8 Termoskanna 9 Doseringslock 10 Lockets kåpa 11 Strilhuvud 12 Stor propp 13 Liten propp 14 Skyddsomkopplare 15 Strömbrytare och kalksignal 16 BODUM måttsked.
vIKtIG InforMAtIon NÄTSLADD – Apparaten är försedd med en kort nätsladd för att reducera risken att någon fastnar i sladden eller snubblar över den. – På villkor att du är tillräckligt försiktig kan en förlängningssladd användas. – Om en förlängningssladd används måste denna uppfylla minst samma vär- den som gäller för själva apparaten.
– Tag ut termoskannan (8) ur kaffebryggaren. Tag sedan försiktigt ut filter- hållaren (6) med isatt kaffefilter (7) ur kaffebryggarens hölje (1). För att brygga en kanna kaffe fyller du kaffefiltret (7) med ca. 8 BODUM måttske- ® dar (16) med bryggmalet kaffe. För en mindre mängd kaffe använder du en förhållandevis mindre mängd malt kaffe.
2 vattenbehållare 3 vattenbehållarens handtag 4 vattenbehållarens lock 6 Filterhållare 7 Kaffefilter 9 Doseringslock 10 Lockets kåpa 11 Strilhuvud 12 Stor propp 13 Liten propp 16 Måttsked – För enkel rengöring skruvar du lös doseringslocket (9) från termoskannan (8). Skölj termoskannan (8) grundligt med varmt vatten efter bruk. Varning: Termoskannan (8) är inte lämpad att diskas i maskin.
– Skölj sedan de olika delarna separat med kallt vatten och skölj apparaten genom att köra den minst två gånger med rent, kallt vatten. Se först till att alla delar har satts tillbaka på rätt sätt i kaffebryggaren. – Allt övrigt underhåll ska utföras av ett auktoriserat serviceombud. renGÖrInG Av strILHuvuDet Strilhuvudet (11) kan rengöras och avkalkas separat.
Page 68: Tekniska Data
GS, CE, ETL, CETL servIce ocH GArAntIvILLKor Alla BODUM produkter är tillverkade av hållbara material av hög kvalitet. Om ® du ändå skulle behöva byta ut någon del, var god kontakta din BODUM åter- ® försäljare, en BODUM butik, den allmänna BODUM representanten i ditt land ®.
Bem-vindo à BoDuM ® Parabéns! Você é o orgulhoso proprietário de uma Cafeteira com Filtro da BODUM . Leia estas instruções atentamente antes de utilizar a ® Cafeteira com Filtro. INSTRUÇÕES DE SEGURANÇA IMPORTANTES – Leia toda a informação antes de usar a cafeteira pela primeira vez. O apa- relho pode provocar lesões ou situações perigosas caso não leia e siga estas.
contacte um electricista qualificado. Não modifique a ficha seja de que forma for. – O aparelho não deve estar ligado à corrente sem água. – Não encha o reservatório com água (2) acima da linha MAX. – O aparelho nunca deve estar ligado à corrente sem o chuveiro do café (11) e o suporte do filtro (6).
7 Filtro do café 8 Jarro térmico 9 Tampa de dosagem 10 Coroa da tampa 11 Chuveiro do café 12 Rolha grande 13 Rolha pequena 14 Interruptor de segurança 15 Botão ON/OFF e indicação de escala 16 Colher de medida BODUM.
InforMAÇÃo IMPortAnte CABO ELÉCTRICO – O aparelho é fornecido com um cabo eléctrico curto, a fim de reduzir o risco de tropeçar e preso num cabo mais comprido. – Embora com extrema cautela, é possível usar uma extensão eléctrica. – Se for usada uma extensão eléctrica os valores nominais indicados na exten- são devem cumprir os mínimos do aparelho.
(6) com o filtro do café dentro (7) com cuidado da base (1) da cafeteira com filtro. Para fazer um jarro de café encha o filtro do café (7) com cerca de 8 colheres de medida BODUM (16) de café moído normal. Para uma quan- ®.
2 Reservatório da água 3 Pega do reservatório da água 4 Tampa do reservatório da água 6 Suporte do filtro 7 Filtro do café 9 Tampa de dosagem 10 Coroa da tampa 11 Chuveiro do café 12 Rolha grande 13 Rolha pequena 16 Colher de medida –.
– Encha o reservatório de água (2) com a solução anti-calcário ou solução de água e vinagre (não encha acima da linha MAX) e coloque o chuveiro de café (11), o suporte do filtro (6), o filtro do café (7) (sem café moído) e o jarro térmico (8) com a tampa de dosagem (9/10) nas suas posições correctas.
Se todas as condições da garantia tiverem sido cumpridas, as reparações serão gratuitas. Não se fazem reembolsos. Garantia: O certificado de garantia deve ser preenchido e carimbado pelo comprador na altura da compra. A BODUM não presta garantia contra danos ®.
BoDuM -laitteen käyttäjäksi ® Onneksi olkoon! Olet nyt pour over -tekniikalla varustetun BODUM ® kahvinkeittimen ylpeä omistaja. Lue nämä ohjeet huolellisesti ennen pour over -tekniikalla varustetun kahvinkeittimen käyttöä. TÄRKEITÄ TURVALLISUUSOHJEITA – Lue kaikki ohjeet ennen laitteen ensimmäistä käyttöä. Ohjeiden ja turvalli- suutta koskevien tietojen noudattamatta jättäminen voi johtaa vaarallisiin.
– Laitetta ei saa koskaan kytkeä päälle ilman kahvisuihkua (11) ja suodatinpi- dintä (6). – vältä kosketusta höyryyn, joka kehittyy suodatusprosessin aikana, sillä tämä voi aiheuttaa palovamman. – Kannen poistaminen keittämisen aikana voi aiheuttaa palovammoja. – Kiehuva vesi voi aiheuttaa palovammoja. –.
1 Kotelo 2 vesisäiliö 3 vesisäiliön kahva 4 vesisäiliön kansi 5 Kotelon kansi 6 Suodatinpidin 7 Kahvisuodatin 8 Termoskannu 9 Annostelukansi 10 Kannen peitelevy 11 Kahvisuihku 12 Suuri korkki 13 Pieni korkki 14 Turvakytkin 15 virtakytkin ja kalkinilmaisin 16 BODUM-mittalusikka.
tÄrKeItÄ tIetoJA vIRTAJOHTO – Laitteessa on lyhyt virtajohto pitkään johtoon sotkeentumisen tai kompastu- misen välttämiseksi. – Jatkojohtoa voidaan käyttää varovaisuutta noudattaen. – Jos jatkojohtoa käytetään, sen nimellisarvojen on noudatettava laitteen vähimmäisnimellisarvoja. Jos laite maadoitetaan, jatkojohdon on oltava kol- mijohtiminen maadoitettu johto. Pitempi johto on asetettava niin, ettei se roiku pöydän reunojen tai työtasojen kulmien yli, että.
– Poista termoskannu (8) pour over -tekniikalla varustetusta kahvinkeittimes- tä. Ota nyt suodatinpidin (6), jossa on kahvisuodatin (7), varovasti pois pour over -tekniikalla varustetun kahvinkeittimen kotelosta (1). voit tehdä täyden kannullisen kahvia täyttämällä kahvisuodattimeen (7) noin 8 BODUM ® mittalusikallista (16) keskikarkeaksi jauhettua kahvia. Pienempään kahvimää- rään tarvitaan sopivasti vähennetty määrä.
2 vesisäiliö 3 vesisäiliön kahva 4 vesisäiliön kansi 6 Suodatinpidin 7 Kahvisuodatin 9 Annostelukansi 10 Kannen peitelevy 11 Kahvisuihku 12 Suuri korkki 13 Pieni korkki 16 Mittalusikka – Kierrä annostelukansi (9) pois termoskannusta (8) puhdistuksen helpottami- seksi. Huuhtele termoskannu (8) perusteellisesti lämpimällä vedellä käytön jälkeen.
– Huuhtele tämän jälkeen erilliset osat perusteellisesti kylmällä vedellä sekä huuhtele laite antamalla kylmän ja puhtaan veden juosta laitteen läpi aina- kin kahdesti. varmista tätä ennen, että kaikki erilliset osat on koottu oikein pour over -tekniikalla varustettuun kahvinkeittimeen . – valtuutetun huoltoedustajan on tehtävä kaikki muut huoltotoimet. KAHvIsuIHKun PuHDIstus Kahvisuihku (11) voidaan puhdistaa ja siinä.
Page 84: Tekniset Tiedot
1,2 litraa / 40 nesteunssia Testimerkinnät GS, CE, ETL, CETL HuoLto- JA tAKuueHDot Kaikki BODUM -tuotteet on valmistettu korkealaatuisista ja kestävistä mate- ® riaaleista. Jos osia joudutaan kuitenkin vaihtamaan, ota yhteys BODUM ® jälleenmyyjääsi, BODUM -myymälään, maasi yleiseen BODUM -edustajaan tai ® ®.
Page 86
Page 88
Page 90
Page 92
(parts & labor) for the ® period of two years from the date of original consumer purchase. To be eligible for warranty coverage the product must be purchased from an authorized BODUM dealer and proof of purchase must be provided. ®.
Details about bodum CAFFETTIERA Kaffee french-press 1,0l
Seller information
Item information
People who viewed this item also viewed

Bodum TRAVEL PRESS Coffee Maker (French Press System, Double-Walled, 0.35 L/12

Bodum Kenya 3 Cup Coffee Maker Black - 0.35L
Bodum French Press Coffee Maker Spare Glass Liner, 0.35l 3Cup
Bodum Kenya French Press Coffee Maker, Borosilicate Glass - 8-Cup (1 L), Black

bodum CAFFETTIERA french press Kaffeebereiter 0,35l - verschiedene Farben

bodum BISTRO french press Kaffeebereiter 1,0l - verschiedene Farben
Kaffee bodum
Bodum Chambord Kaffeebereiter / Kocher / French Press für 4 Tassen Kaffee, 0.5 l, Glänzend, 11171-16
Was das Kaffeebrauen angeht, ist Handarbeit beliebter denn je - wenn man das Runterdrücken des Kolbens als Handarbeit bezeichnen darf. Mit unseren Kaffeebereitern entfalten sich die Kaffeebohnen in ihrem vollsten Aroma. So ist es nicht verwunderlich, dass die manuellen Kaffeebereiter die Lieblings-Methode aller Kaffeegenießer ist. Der einfachste Weg zu einer guten Tasse Kaffee: grob gemahlenen Kaffee, heißes Wasser, 4 Minuten ziehen lassen und Kolben runterdrücken. Die neuste Generation des Chambord besitzt einen Klappmechanismus im Deckel, welcher den Kaffeebereiter dicht hält - sollte er einmal umfallen. Der Chambord ist aus Borosilikatglas, Kunststoff, Silikon sowie verchromtem- oder vergoldetem Stahl.
1 x 1 Bodum Chambord Kaffeebereiter für 4 Tassen Kaffee, 0.5 l, Glänzend, 11171-16
- Mit dem Bodum Kaffeebereitern entfalten sich die Kaffeebohnen in ihrem vollsten Aroma
- Der einfachste Weg zu einer guten Tasse Kaffee: grob gemahlenen Kaffee, heißes Wasser, 4 Minuten ziehen lassen und Kolben runterdrücken
- Die neuste Generation des Chambord besitzt einen Klappmechanismus im Deckel, welcher den Kaffeebereiter dicht hält - sollte er einmal umfallen
- Für Spülmaschinen geeignet
- Lieferumfang: 1 Bodum Chambord Kaffeebereiter für 4 Tassen Kaffee, 0.5 l, Glänzend, 11171-16
Kaffee bodum
Buy Moka Pots & Stovetop Espresso Makers from Bialetti, Alessi, Bodum, Cuisinox, DeLonghi, Primula, coffee makers imported from Italy
"Web's Best Moka Pot Coffee Authority Site! Find Your Perfect Italian Espresso Coffee Maker Now!"
recommended products

Aerolatte Café Porcella Coffee Pot Review
Reviewed on Dec 17, 2013
Aerolatte Café Porcella Review The Aerolatte Cafe Porcella Stove Top Espresso Maker[check price] model is a simple yet efficient espresso maker widely affordable for a wide segment of coffee lovers. The style of the appliance is based on the traditional Italian one, as it can be easily.

Bodum Chambord Moka Pot Review
Reviewed on Sep 11, 2013
The myth that says in order to get an excellent cup of espresso, you need to spend hundreds of dollars on a machine has been overthrown with the launch of the Bodum Chambord Aluminum Stovetop Espresso Maker [check price]. Not only does the Bodum Chambord require a minimal investment, it.

Bialetti Mukka Moka Pot Review
Reviewed on Apr 13, 2013
Bialetti Mukka Review The Bialetti Mukka Express caters to not only the versed cappuccino enthusiasts who cannot start a day without a steaming cup of their favorite beverage, but also those who are yet unfamiliar with what an excellently brewed one is all about. If you were to describe.

Giannini Giannina Moka Pot Review
Reviewed on Mar 30, 2013
Since back in 1986 when it was first launched on the market, Giannini Giannina [check price] has captured the hearts of millions coffee lovers from all around the world. The Giannini Giannina espresso maker is not only efficient in preparing 6 to 9 delicious cups of coffee every single.

Cuisinox Liberta Moka Pot Review
Reviewed on Feb 15, 2013
Overview of the Cuisinox Liberta Moka Pot At first glance, the Cuisinox Liberta [check price] resembles a teapot rather than an espresso maker, due to the shape and simplicity of the product. However, at closer inspection, the customer will notice that the construction which in fact aims.
recent product reviews

Moka Pot Instructions and Brewing Techniques
Reviewed on Jun 18, 2013
First of all, do you already have a moka pot? If not, you might want to take a look at our most recommended stovetop coffee pot first! Brewing a good cup of espresso coffee on a stovetop with a moka pot is very easy as long as you monitor the water temperature. Follow these easy instructions on how to brew coffee with a moka pot and you’ll have the perfect cup of stovetop espresso in no time. 8 Easy Steps to Brew Coffee with a Moka Pot Instructions 1. Boil some fresh, hot water beforehand. 2. Transfer the hot water into the bottom section of the moka pot. Do not overpour, stop before the water reaches the relief valve.

Best Coffee For Moka Pot & Stovetop Espresso Makers
Reviewed on Apr 7, 2013
Most Recommended Coffee Bean Blends For Stovetop Espresso Makers and Moka Coffee Pots For brewing great, aromatic coffee using stovetop espresso makers such as moka pots, there are no set rules on what coffee beans are required. A lot of trial and error is expected as taste is very subjective. However, our experience over brewing coffee with moka coffee pots and stovetop espresso makers can help you narrow down the types of coffee blend options depending on your taste and preference. If you still haven’t decided on what moka coffee pot to purchase, check out our stovetop espresso maker recommendations! Basic Coffee Grind Size For Moka Coffee Pots and Stovetop Espresso Makers The basic guide would be to grind.

Bialetti Brikka 4 Cup Moka Pot Review
Reviewed on Feb 14, 2013
In a nutshell, the Bialetti Brikka 4 Cup Stovetop Coffee Pot is an innovative coffee making solution for those who enjoy the taste of a good cup of Joe. The Bialetti stovetop pot has a distinctive design and its casing is designed from finely polished aluminum, making it blend seamlessly in the decor of created contemporary kitchens. However, looks are not the only reason to acquire the Bialetti coffee maker, since in addition to the great taste; it is also able to process up to four regular cups within just a few minutes. Bialetti Brikka 06988 4 Cup Stovetop Coffee Pot Review Therefore, this appliance is ideal for people who do not have a lot of time to waste in.

Bellman SS Stovetop Espresso Maker Review
Reviewed on Feb 22, 2012
Bellman SS Overview The Bellman SS Stove Top Espresso/Cappuccino Maker [check price] is regarded as one of the most convenient creations of the company, mainly because unlike the vast majority of stovetops in its price range, it has two integrated functions. Basically, the Bellman SS is not just your typical espresso maker, but it can also be used to prepare cappuccino beverages. Light, easy to use but not so easy to master, this stovetop cappuccino and espresso maker has adjustable features and is a really versatile machine. More importantly, it is manually operated and the pressure as well as the temperature can be manipulated during its functioning. Let’s find out more about the Bellman SS stovetop and its attractive.

Stella Inox Satinato Moka Pot Review
Reviewed on Feb 13, 2012
Overview of the Stella Inox Satinato Stella is a line of products created by a famous Italian manufacturer, Scarbi, Chiozzi & C, and the quality craftsmanship as well as the durability can be seen right away from the looks of the Stella Inox Satinato Stovetop Espresso Maker [check price]. Although they have a substantially wider array in their inventory of appliances other than espresso makers, the Stella Inox Satinato 10-cup model is among their most respected devices, but smaller 6-cup and 2-cup variants are available as well. After all, this product combines nearly three generations of experience and the finest materials money can buy with the always surprising Italian innovations in the field of coffee makers. But what makes.

The Italian Stovetop Espresso Maker (Moka Pot) vs. Electronic Espresso Machine
Reviewed on Feb 13, 2012
In order to better understand the differences between what is regarded as an espresso maker machine and a moka stovetop, it is necessary to clear the air a bit. We’ll start by informing you that even though some moka stovetops are regarded as stovetop espresso makers, their product is in fact what can be regarded as a glorified moka type of coffee. What’s The Difference Between An Italian Stovetop Moka Pot vs. Electric Espresso Machine While the espresso maker’s concept relies on lower temperatures and high pressure; for the moka stovetop, it’s the other way around. Granted, some of the new stovetop models have began to employ the high-pressure principle, they are far from the capabilities of an espresso.

Alessi La Conica Moka Pot Review
Reviewed on Dec 26, 2011
Alessi La Conica Stovetop Espresso Maker Review As any user would easily point out, the design of the Alessi La Conica Stovetop Espresso Maker is outstandingly innovative. The cylindrical stovetop has charm and elegance without integrating any particular gimmicks or complex features. In essence, the shape of the Alessi La Conica screams pure functionality and its polished exterior conveys no less. Features of Alessi La Conica Strong stainless steel construction with mirror-polish exterior Measures 9 inches in height and 8 inches in diameter Weighs 1.8 pounds Perfect for those who prefer strong, yet tasty coffee Steel base is magnetized for more stability Reputation The lovely Alessi La Conica Stovetop Espresso Maker was, as you may have expected, created by.

Bialetti Musa Moka Pot Review
Reviewed on Dec 25, 2011
Bialetti Musa Review Have you heard about any coffee makers that are better than the Bialetti Musa 6-Cup Stovetop Percolator? Neither have we! The Bialetti Musa is one of the coronation products resulted from the experience of this world famous Italian manufacturer. Not surprisingly, this model is listed among the best sellers, as its extremely low price and the excellent taste have made it quite appealing to the enthusiasts and people who are not diehard coffee fans alike. The casing of the Musa model is constructed from stainless steel which makes it virtually rust proof and does not alter the taste during the brewing. Talking about features, let’s see what Bialetti has in store for you! Features of the.

Facts and Myths of Aluminum Moka Coffee Pot Safety and Health Risks
Reviewed on Aug 2, 2011
Are Aluminum Stovetop Coffee Pots Safe? There are a lot of statements floating around claiming that aluminum moka coffee pots, or any aluminum cookware, in general, are bad for your health and increases the risk of Alzheimer’s disease. Despite the fact that there are no hard evidence correlating aluminum cookware and aluminum moka coffee pot safety to the increased chances of getting such illnesses, false facts and half-lies still hover around the internet including product reviews. MokaCoffeePots sheds light on some facts and myths that should allow you to make an informed decision for yourself about aluminum moka coffee pots. Facts Most people absorb between 30-50mg of aluminum through regular food source and atmospheric exposure daily with no ill.

Replacing Moka Pot Rubber Seals & Gaskets
Reviewed on Jul 27, 2011
The simple design of a moka pot means that if something goes wrong with the pot, it’s easy to repair the moka pot yourself at home. 99% of the time, it’s the rubber seals and gaskets that need attention as the moka pot ages. The rubber seals can tear, stretch, go stiff and brittle, and snap off due to age and mishandling. Instructions on Moka Coffee Pot Gasket and Seals Replacement Luckily, the moka pot rubber seals and gaskets are cheap and easy to replace. The instructions below applies to Bialetti coffee pots but applies to any other brand of moka pot or stovetop espresso maker. Before you begin, you’ll need to have these spare replacement rubber gaskets ready on.

Popular Types & Brands of Moka Pots and Italian Espresso Makers
Reviewed on Jul 27, 2011
Italian Moka Pot Brands and Stovetop Coffee Maker Types Explained The design and construction of different moka pots tend to produce a coffee with slightly different taste and characteristics. In addition, some moka coffee pot designs, such as stainless steel espresso makers, are more adapted to more modern, electric and induction stovetops where traditional aluminum materials won’t work on because the heat won’t transfer through aluminum. In case you’re wondering, this is our MOST recommended moka coffee pot. And if you’re new to all this stovetop espresso brewing using moka pots experience, you can’t go wrong with our budget-friendly moka pot recommendations either. Types of Moka Coffee Pot and Popular Brands or Stovetop Italian Espresso Makers In this page, we’ll.

Cleaning and Maintenance for Moka Pots
Reviewed on Jul 27, 2011
How To Take Care and Clean Your Coffee Pot And Keep Your Moka Pot in Peak Brewing Condition Your moka pot has a very simple design and it doesn’t take much effort to keep the coffee pot like new in terms of functionality as long as you follow some simple instructions and tips. If you’re looking for a new moka stovetop pot for your coffee fix, check out our Top Stovetop Moka Coffee Pot Recommendations! General Moka Pot Tips Aluminum Moka Pots Are NOT Dishwasher Safe” Never wash your aluminum moka pot in a dishwasher! Clean and Wash Your Moka Pot with Plain Water Detergents are not necessary when it comes to cleaning moka pots, neither are scrubbing pads.
Top Rated Products
Bellman SS Stovetop Espresso Maker Review.
Cuisinox Liberta Moka Pot Review.
Alessi La Conica Moka Pot Review.
Bialetti Musa Moka Pot Review.
Search for Moka Pot Articles!
New and Popular
The matte black aluminum is extremely masculine as well. It's one of the cheapest 12oz. model out in the market too!

Комментариев нет:
Отправить комментарий